Free NNAT3 practice test for Grades 3 and 4.

Try 16 Level D puzzles for 3rd grade and 4th grade. These original workbook questions are independent practice. They are not official test items and do not predict a score.

Test facts

Test and publisherNaglieri Nonverbal Ability Test, Third Edition · Pearson
Level DGrades 3 and 4
Real testThe real test is longer: 48 questions and 30 minutes of working time. Each abstract design has five answer choices. No reading or arithmetic is required.
This free set16 color puzzles from the four skill builders, with every answer explained. Print in color.
Read the sourced parent guide

Print the questions and answer key

Print in color at actual size on US Letter paper. Give your child pages 2–9. Keep pages 10–13 for checking answers. No email required.

Download printable PDF ↓

NNAT3 sample questions

A stretch question is the hardest in its section. It is fine to skip it.

Pattern completion sample questions

Choose the patch that completes the picture.

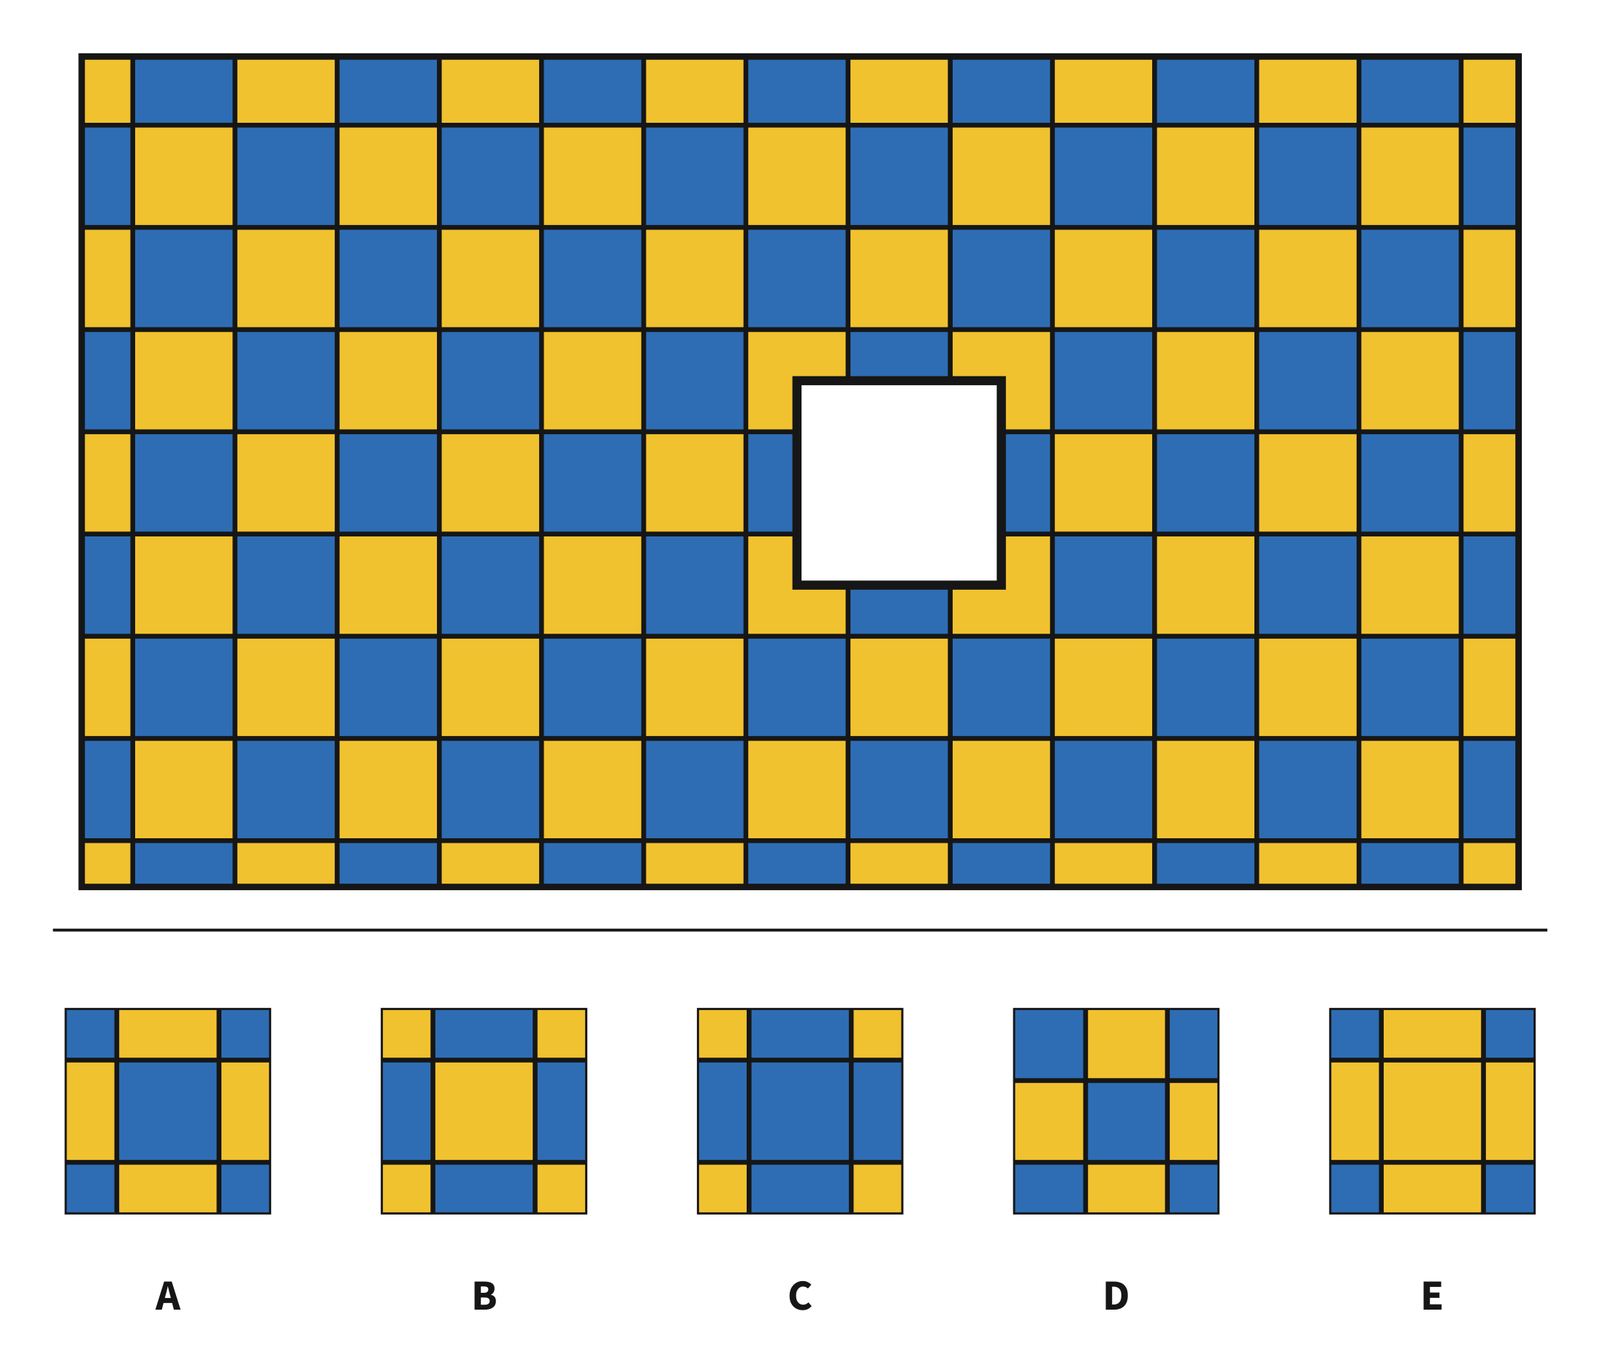
Question 1

A blue and yellow checkerboard has a square white opening just right of center. The opening cuts through tiles on all four edges. At the top edge of the opening the colors from left to right are yellow, blue and yellow. Choices: A. Blue corners and central square, yellow edge centers. B. Yellow corners and central square, blue edge centers. C. Yellow corners, blue center and blue edge centers. D. Blue corners and center with yellow edge centers; the middle tile is narrower than in A. E. Blue corners, with yellow center and edge centers.
From the workbook, p. 25 · Open full-size picture
Show answer and explanation for question 1

Answer B. The picture is a checkerboard: the colors take turns along every row. Continue the squares into the white box so every square lines up with its neighbors and the colors keep their order. The correct patch has to pick up the colors that touch the box. For example, along its top edge the main colors go yellow, blue, yellow. Choice B is the only patch that does this on every edge. Choice A has the two colors on the wrong squares. Choice C has one square in the wrong color. Choice D has one square in the wrong color and also has squares that are too small. Choice E has one square in the wrong color and also has the two colors on the wrong squares.
Question 2

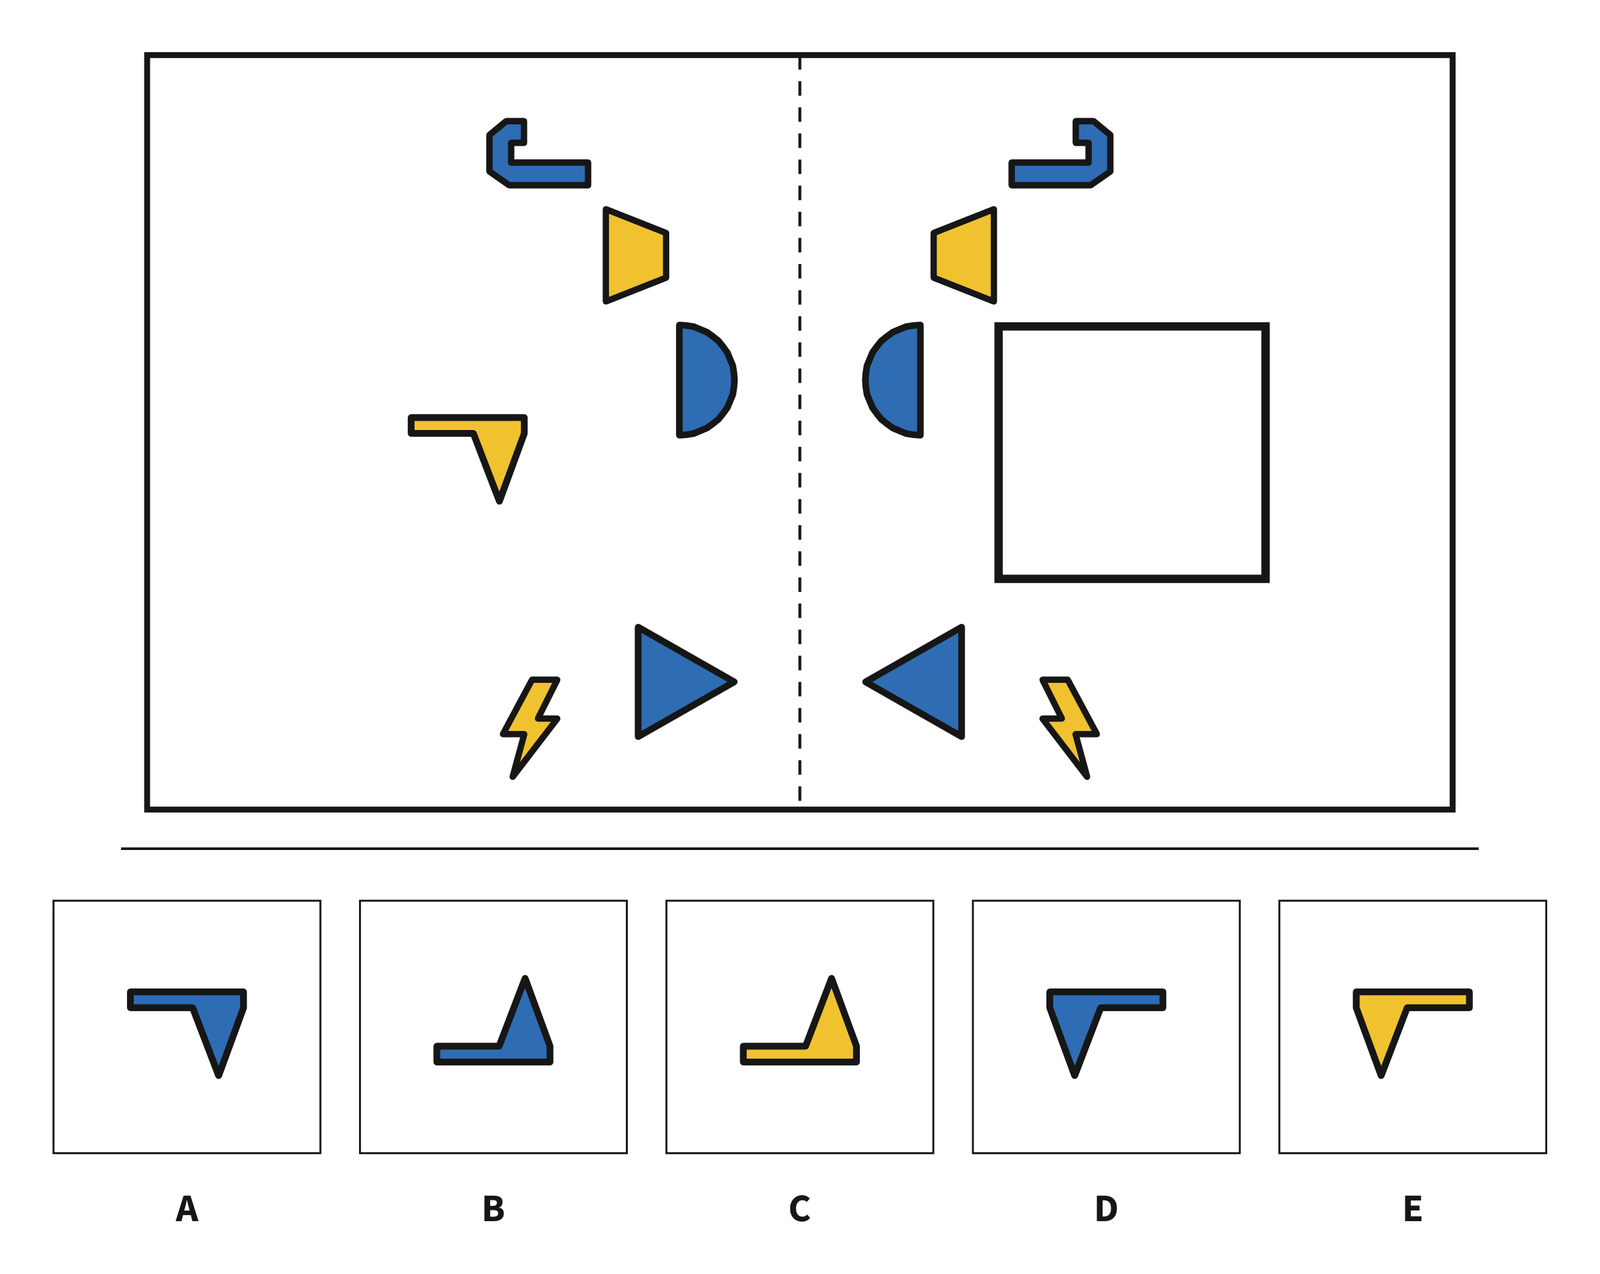
A dashed vertical line divides a field of small blue and yellow shapes. Both sides show a blue hook, a yellow trapezoid, a blue semicircle, a triangle and a bolt. A yellow horizontal bar with a downward point at its right end sits opposite the white opening. Choices: A. Blue bar pointing down at right. B. Blue bar pointing up at right. C. Yellow bar pointing up at right. D. Blue bar pointing down at left. E. Yellow bar pointing down at left.
From the workbook, p. 26 · Open full-size picture
Show answer and explanation for question 2

Answer E. The two halves of the picture are mirror images: fold the page along the dashed line and every shape on the right lands exactly on its partner on the left. Find the part of the left side that matches the white box and flip it like a mirror. Choice E is the only patch that matches. Choice A copies the shape without flipping it and changes its color. Choice B flips the shape upside down instead of side to side, and changes its color. Choice C flips the shape upside down instead of side to side. Choice D changes the color of one shape.

Question 3

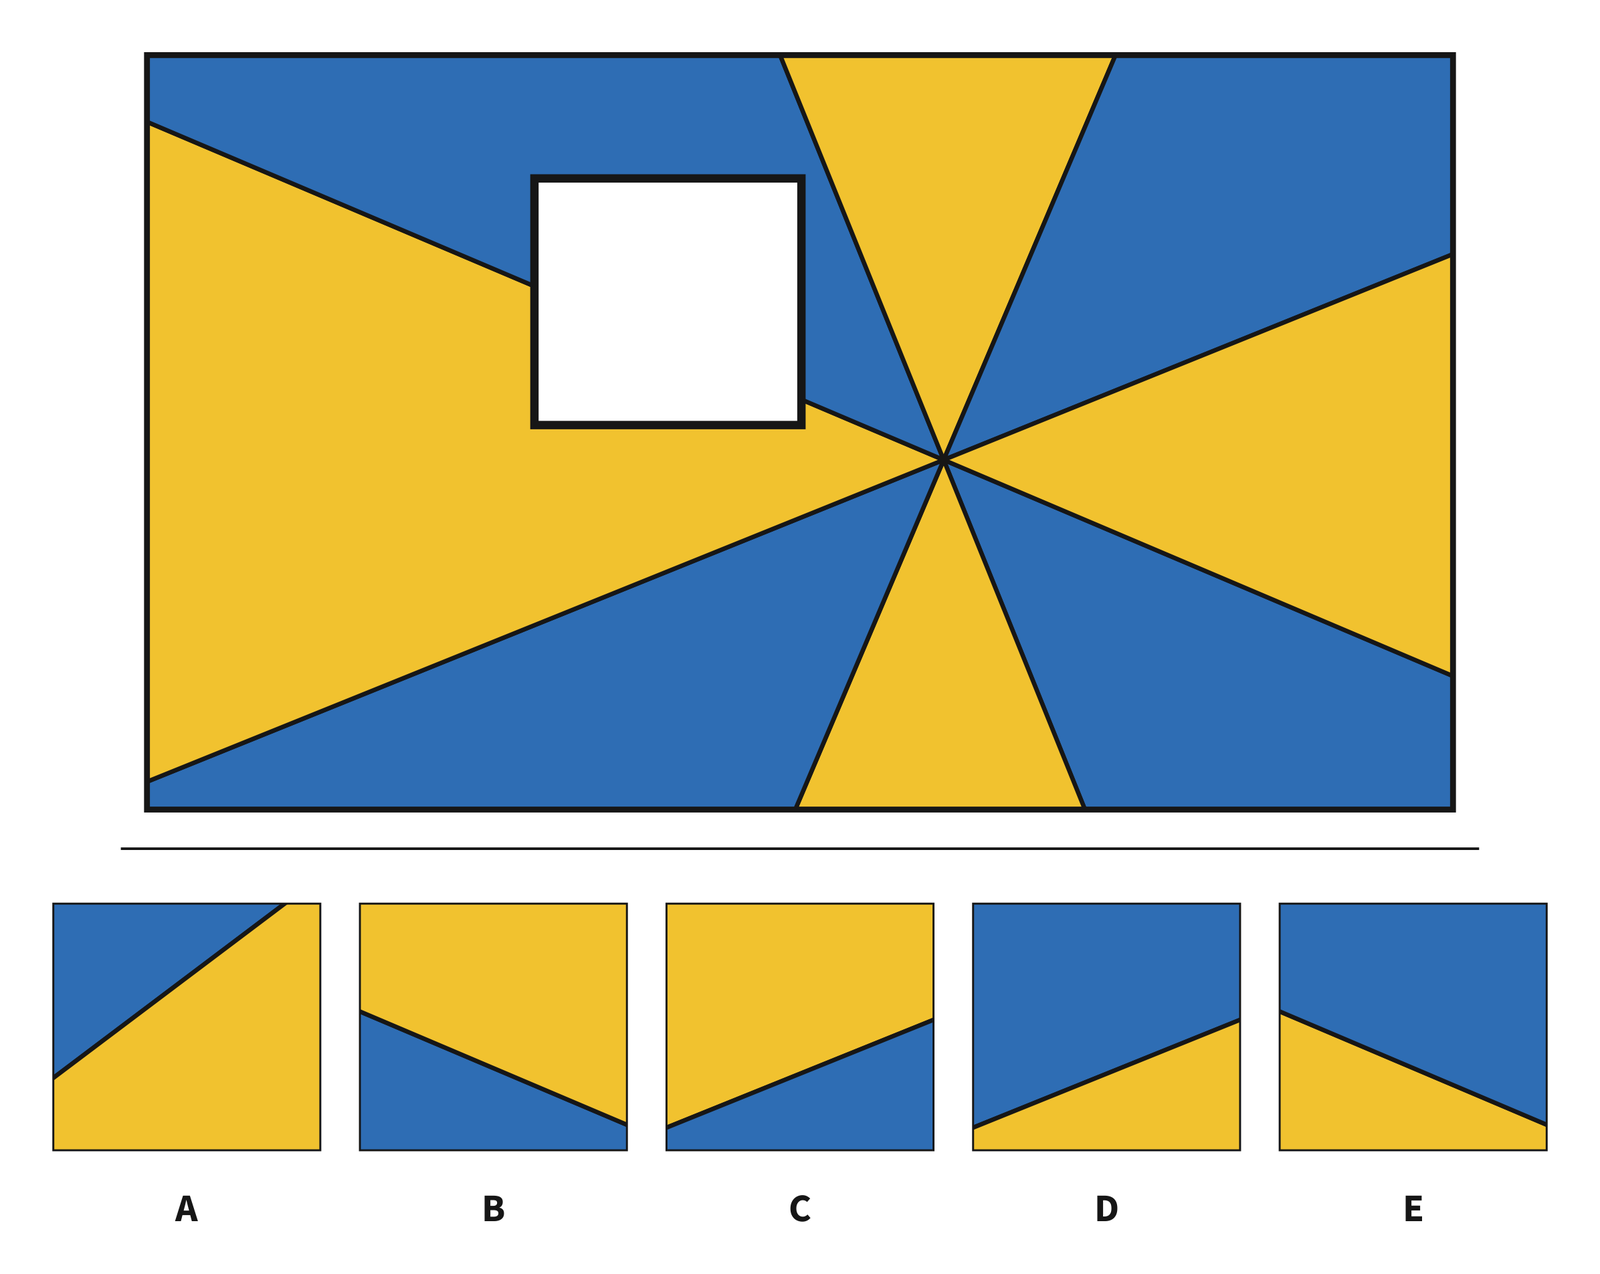
Blue and yellow wedges meet at a point to the lower right of a white square. A boundary between blue above and yellow below meets both sides of the opening, higher on the left. Choices: A. Blue upper left, steep rising diagonal. B. Yellow above a descending diagonal. C. Yellow above a rising diagonal. D. Blue above a rising diagonal. E. Blue above a descending diagonal.
From the workbook, p. 27 · Open full-size picture
Show answer and explanation for question 3

Answer E. The picture is a pinwheel: slices spread out from one center point, and the colors take turns going around. Extend each slice edge from the outside of the white box back toward the center point; the edges must keep pointing at the center. The correct patch has to pick up the colors that touch the box. For example, down its left edge the main colors go blue, yellow. Choice E is the only patch that does this on every edge. Choice A comes from the other side of the pinwheel and also has slices that are too wide, so its slice edges are missing or in the wrong places. Choice B has the slice colors in the wrong places. Choice C comes from the other side of the pinwheel and has the slice colors in the wrong places. Choice D comes from the other side of the pinwheel, so the slices lean the wrong way.

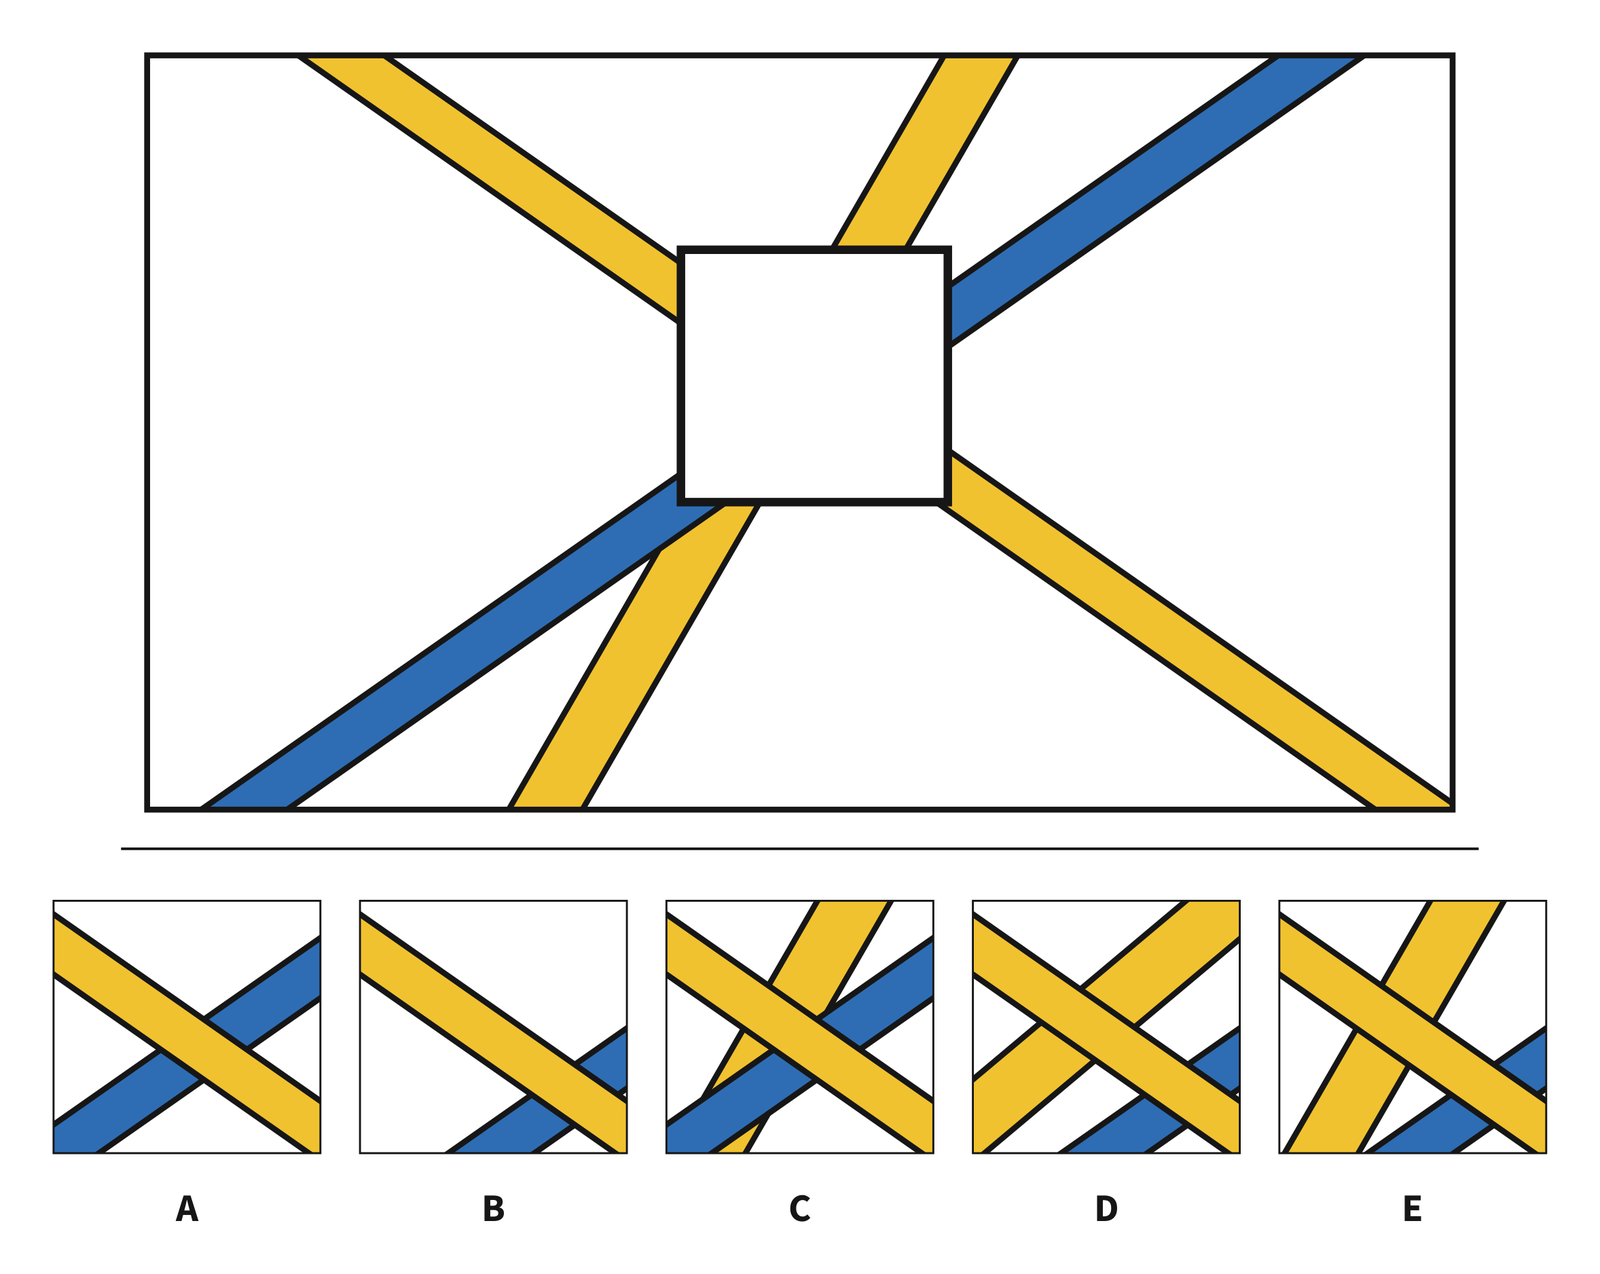
Question 4 · Stretch question

Three bands cross a white opening. From top left a narrow yellow stripe descends right. A blue stripe runs from lower left to upper right. A steeper yellow stripe runs from the lower edge toward the upper right. Choices: A. One yellow and one blue stripe crossing. B. Descending yellow and a blue stripe near the lower-right corner. C. Descending yellow over a steep rising yellow stripe and a shallower rising blue stripe. D. Descending yellow over a rising yellow stripe and a blue stripe near the lower-right corner. E. Descending yellow over a steep rising yellow stripe and a blue stripe near the lower-right corner.
From the workbook, p. 30 · Open full-size picture
Show answer and explanation for question 4

Answer C. The picture has three straight bands that cross each other. Each band keeps its color, width, and direction all the way across. Take one band at a time. Find where it touches one side of the white box and where it comes out on the other side, and picture a straight path between those two spots. The patch must show that band along that path, with the same color and width. Then do the same for the next band. The correct patch has to pick up the colors that touch the box. For example, down its left edge the main colors go white, yellow, white, blue. Choice C is the only patch that does this on every edge. Choice A leaves out one of the yellow bands. Choice B leaves out one of the yellow bands and also moves the blue band so it no longer lines up. Choice D tilts one of the yellow bands at the wrong angle and also moves the blue band so it no longer lines up. Choice E moves the blue band so it no longer lines up.

Reasoning by analogy sample questions

Look at the relationship between the pictures and choose the missing one.

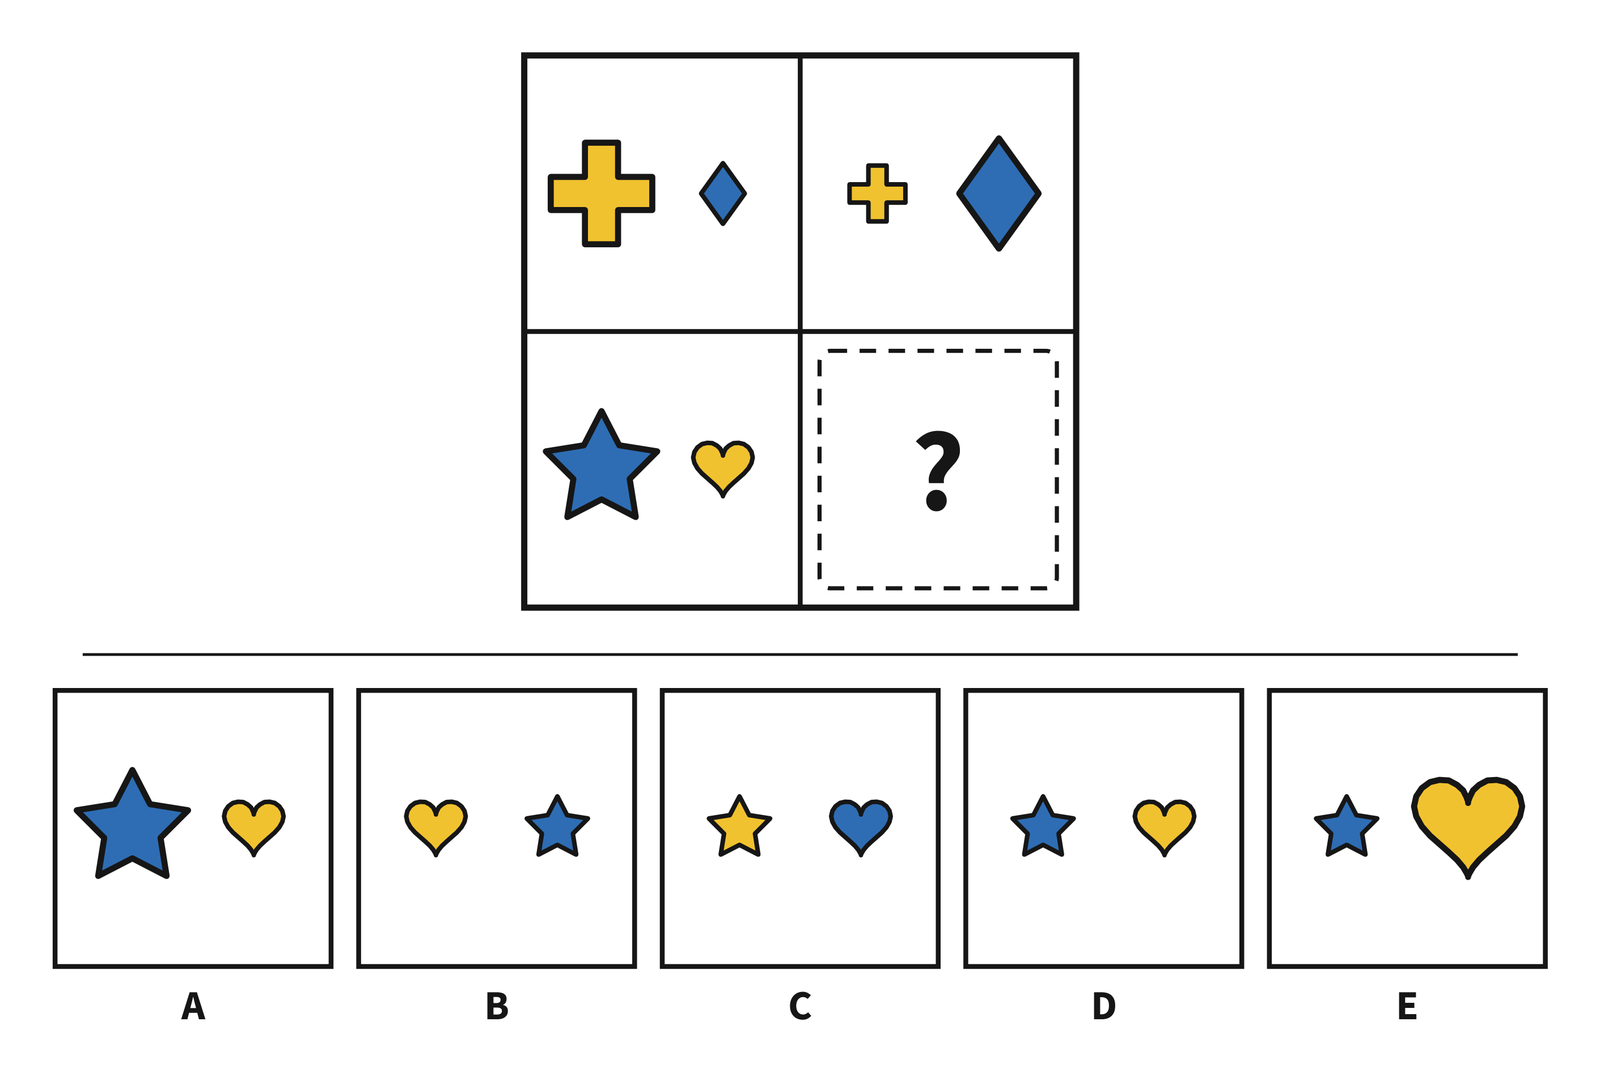
Question 5

Top left: a large yellow plus and a small blue diamond. Top right: a small yellow plus and a large blue diamond. Bottom left: a large blue star and small yellow heart. Bottom right: question mark. Choices: A. Large blue star, small yellow heart. B. Small yellow heart, small blue star. C. Small yellow star, small blue heart. D. Small blue star, small yellow heart. E. Small blue star, large yellow heart.
From the workbook, p. 54 · Open full-size picture
Show answer and explanation for question 5

Answer E. In the top row, the big shape becomes small and the small shape becomes big. They stay in the same places. Trade the sizes in the bottom picture the same way. The missing picture is a small blue star and a yellow heart: choice E. Choice A leaves both sizes unchanged. Choice B puts the shapes in each other's places and makes the heart too small. Choice C has the wrong color (yellow) and the wrong size (too small). Choice D shrinks the left shape but forgets to grow the right one.

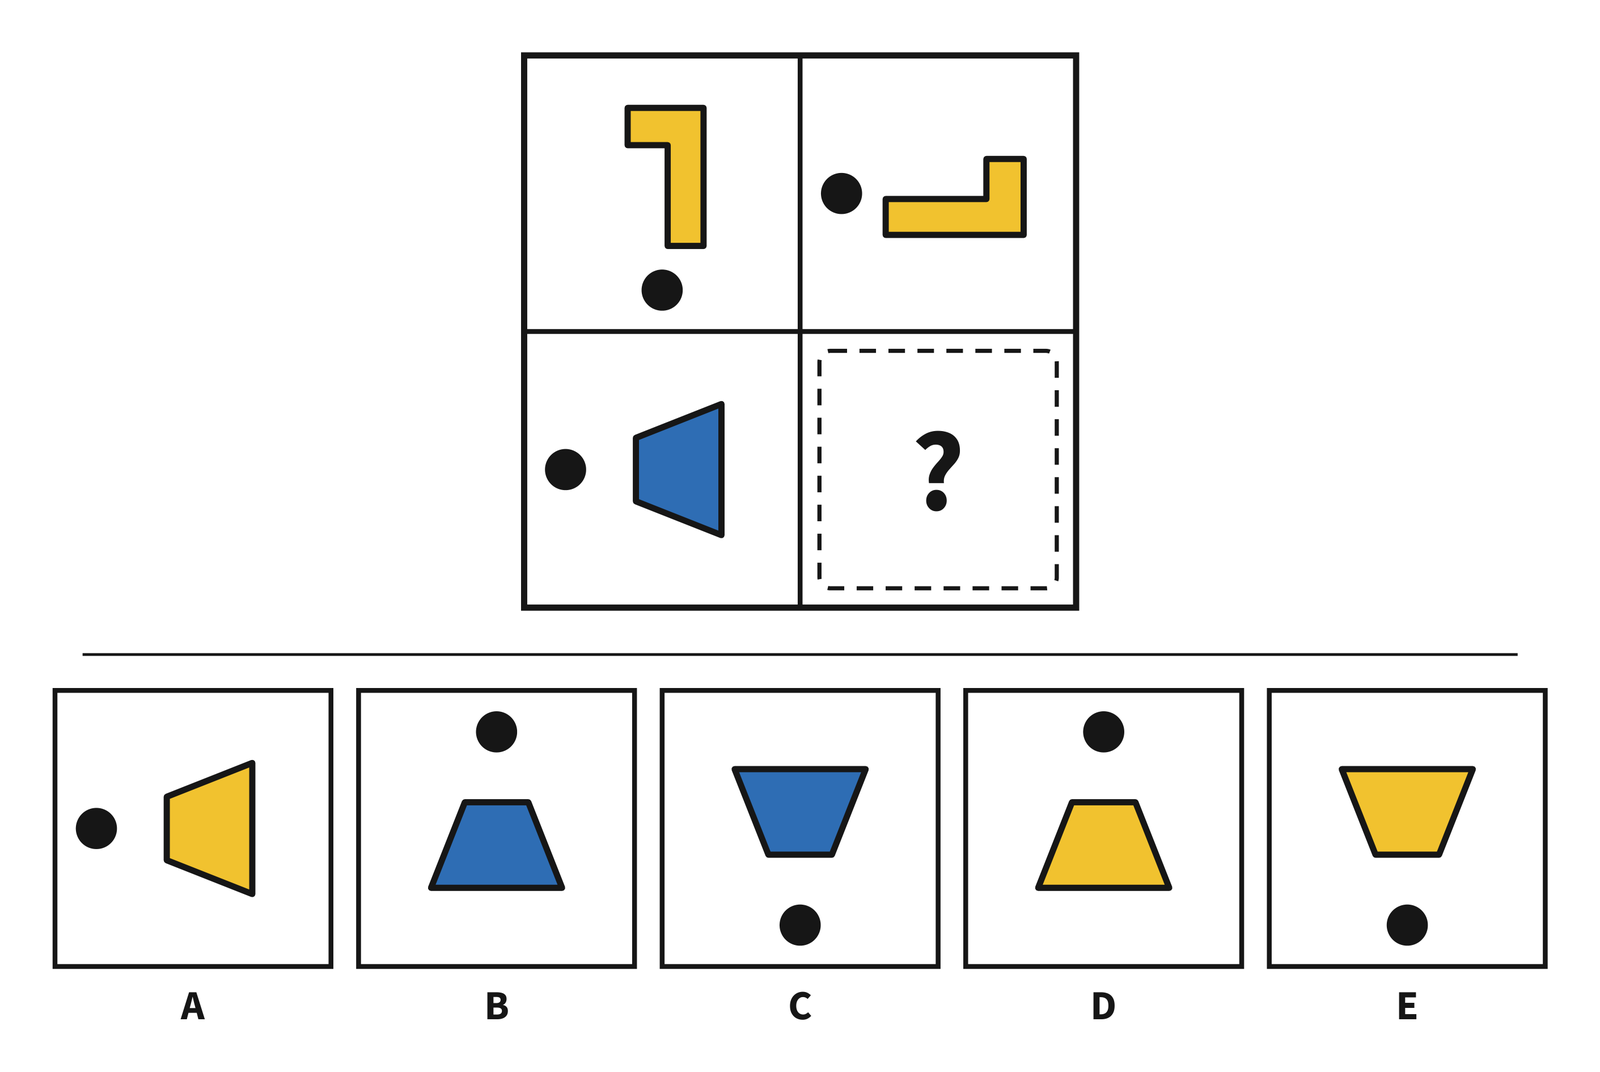
Question 6

Top left: a yellow bent bar with a long vertical arm, short upper arm pointing left and a black dot below. Top right: a yellow bar with a long horizontal arm, a short arm pointing up at the right and a black dot to the left. Bottom left: a blue trapezoid with a short vertical left edge, a longer right edge and a dot on its left. Bottom right: question mark. Choices: A. Yellow trapezoid, taller at right, dot left. B. Blue trapezoid, wider below, dot above. C. Blue trapezoid, wider above, dot below. D. Yellow trapezoid, wider below, dot above. E. Yellow trapezoid, wider above, dot below.
From the workbook, p. 55 · Open full-size picture
Show answer and explanation for question 6

Answer B. In the top row, the picture turns a quarter turn to the right (clockwise). Turn the bottom picture the same amount in the same direction. The missing picture is a blue trapezoid with its wide side at the bottom, and a black circle: choice B. Choices A and E each have the wrong direction, the wrong position and the wrong color (yellow). Choice C turns the wrong way. Choice D turns correctly but changes the color.

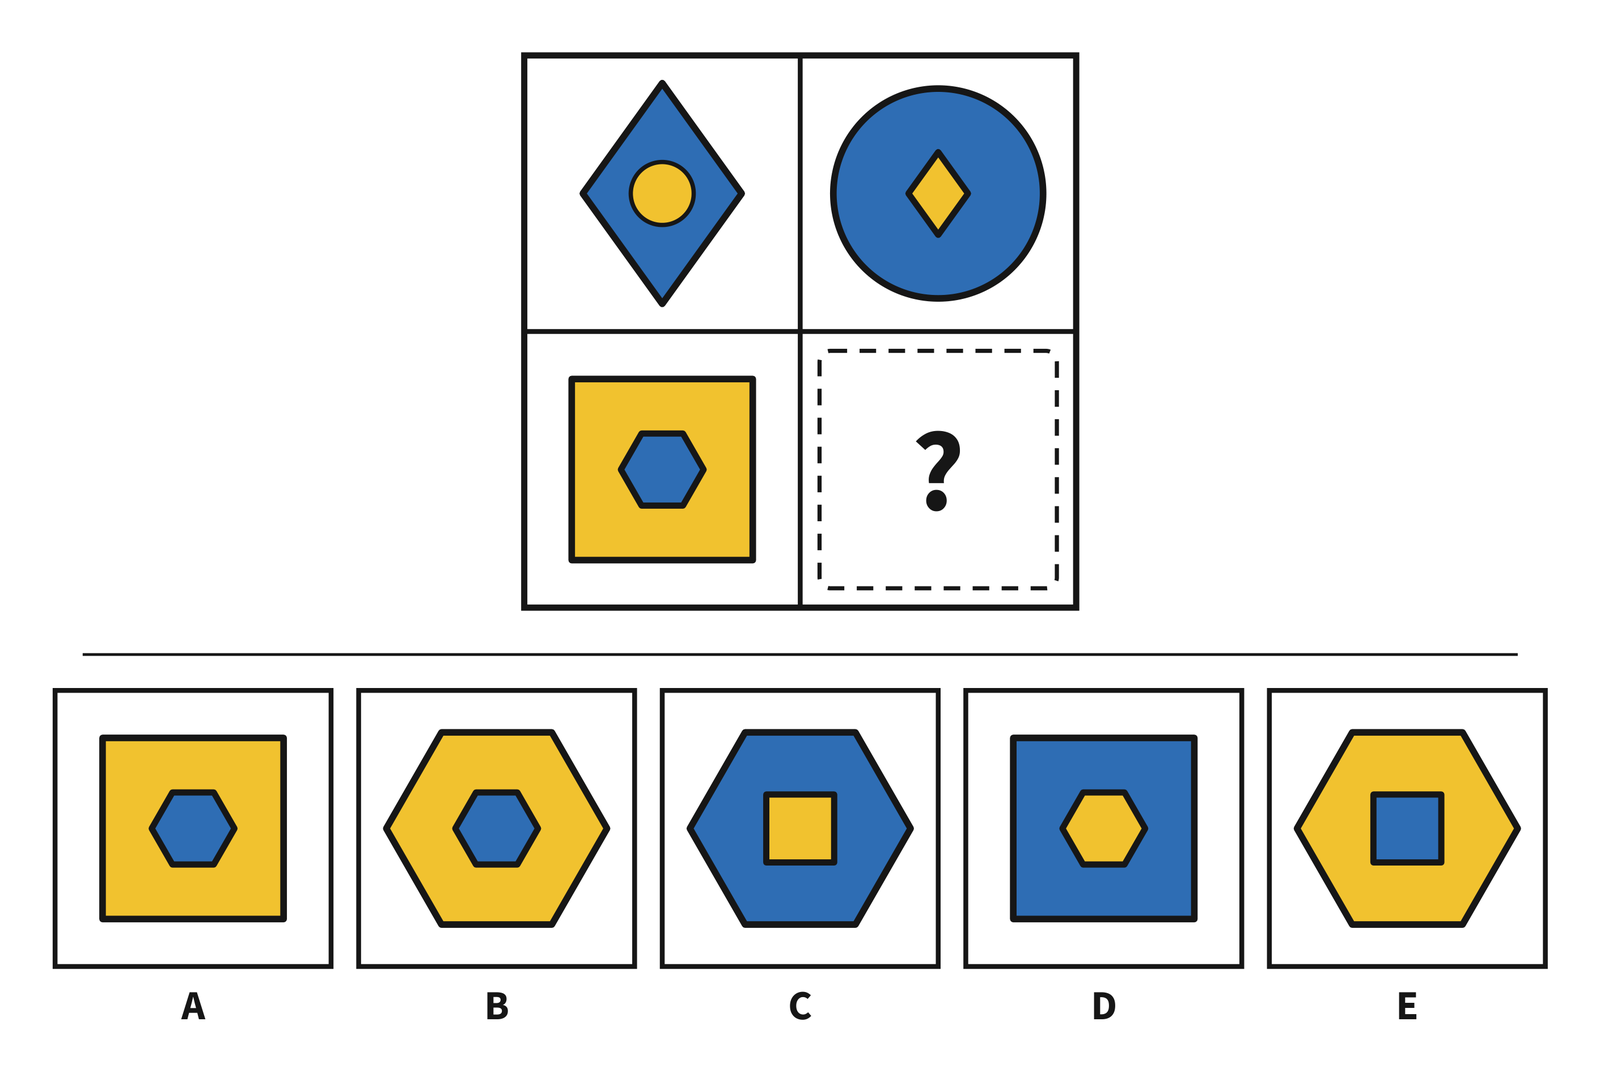
Question 7

Top row: a blue diamond around a yellow circle, then a blue circle around a yellow diamond. Bottom row: a yellow square around a blue hexagon, then a question mark. Choices: A. Yellow square around blue hexagon. B. Yellow hexagon around blue hexagon. C. Blue hexagon around yellow square. D. Blue square around yellow hexagon. E. Yellow hexagon around blue square.
From the workbook, p. 56 · Open full-size picture
Show answer and explanation for question 7

Answer E. In the top row, the outside shape and the inside shape trade places. Each color stays where it was: the outside keeps the outside color. Make the two shapes in the bottom picture trade places the same way. The missing picture is a big yellow hexagon and a small blue square: choice E. Choice A leaves the shapes where they were. Choice B changes only the big shape. Choice C trades the shapes but also trades the colors. Choice D trades the colors instead of the shapes.

Question 8 · Stretch question

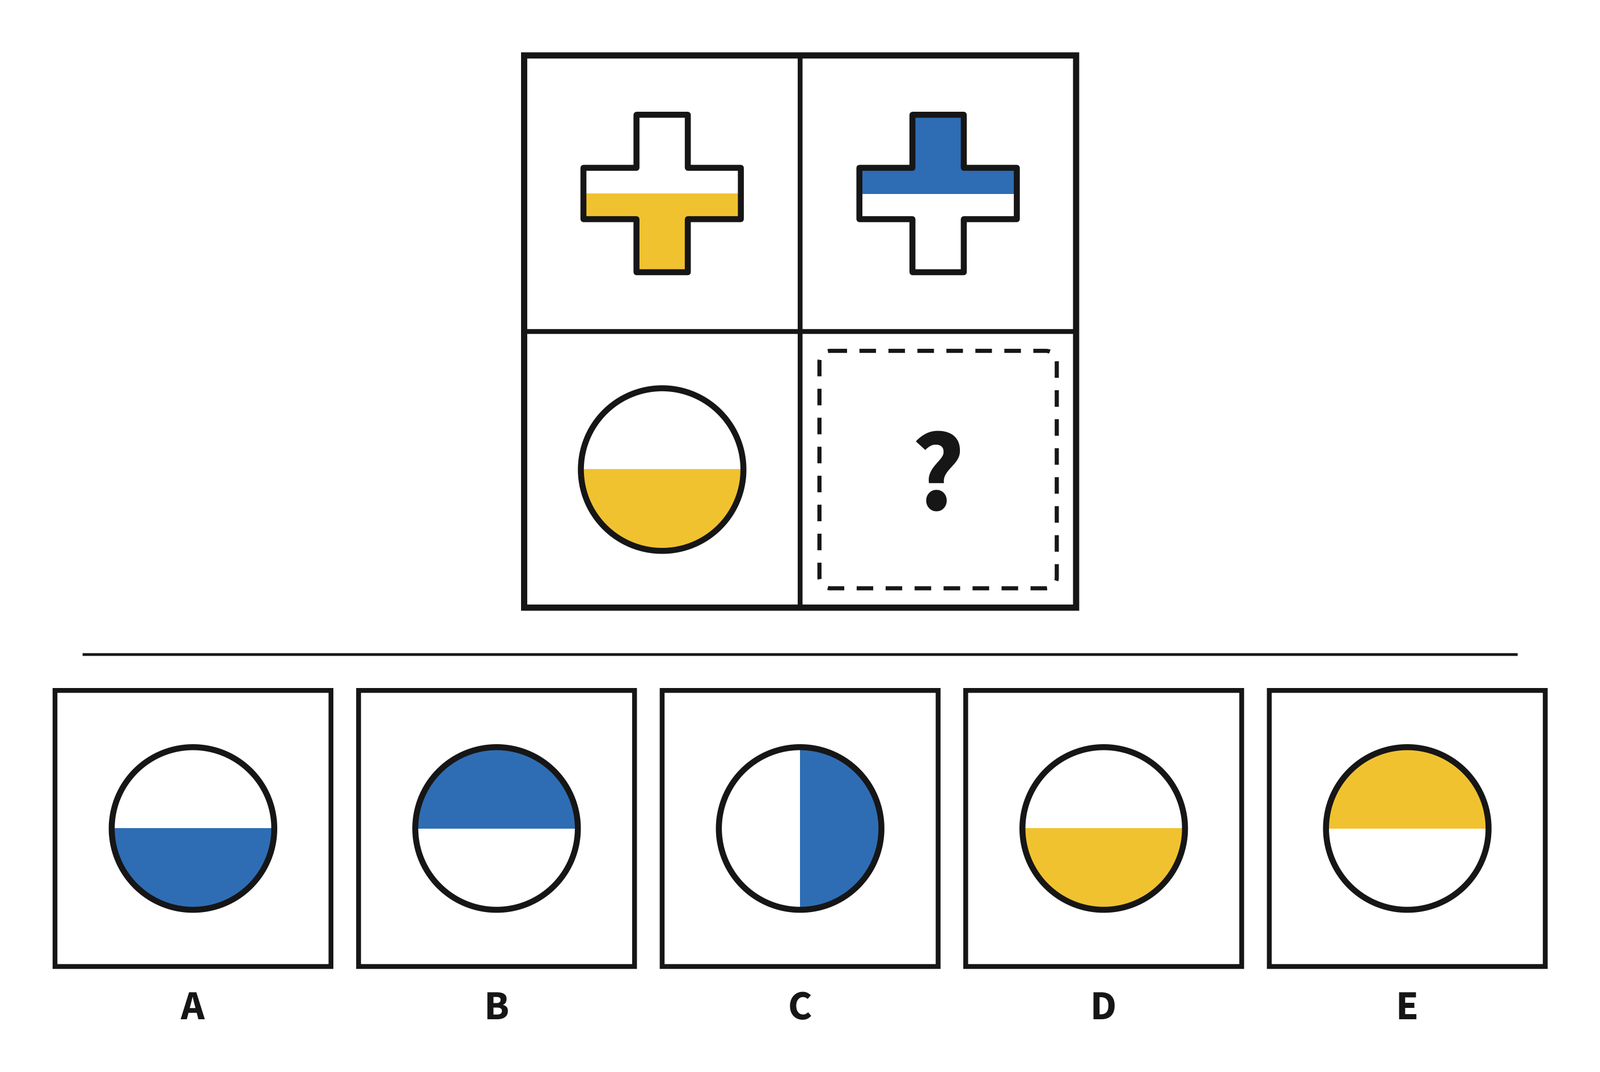
Top row: a plus divided horizontally, white above yellow, then a plus with blue above white. Bottom row: a circle divided horizontally, white above yellow, then a question mark. Choices: A. White above blue. B. Blue above white. C. White to the left of blue. D. White above yellow. E. Yellow above white.
From the workbook, p. 57 · Open full-size picture
Show answer and explanation for question 8

Answer B. In the top row, two things happen: the color moves from the bottom half to the top half, and it switches from yellow to blue. Make the same change to the shape in the bottom row. The missing picture is a circle with the top half blue and the other half white: choice B. Choice A changes the color but forgets to move it to the other half. Choice C changes the color but moves it to a half that runs the wrong way. Choice D makes no change at all. Choice E moves the colored half but forgets to change its color.

Serial reasoning sample questions

Look along the rows and columns and choose the picture for the empty space.

Question 9

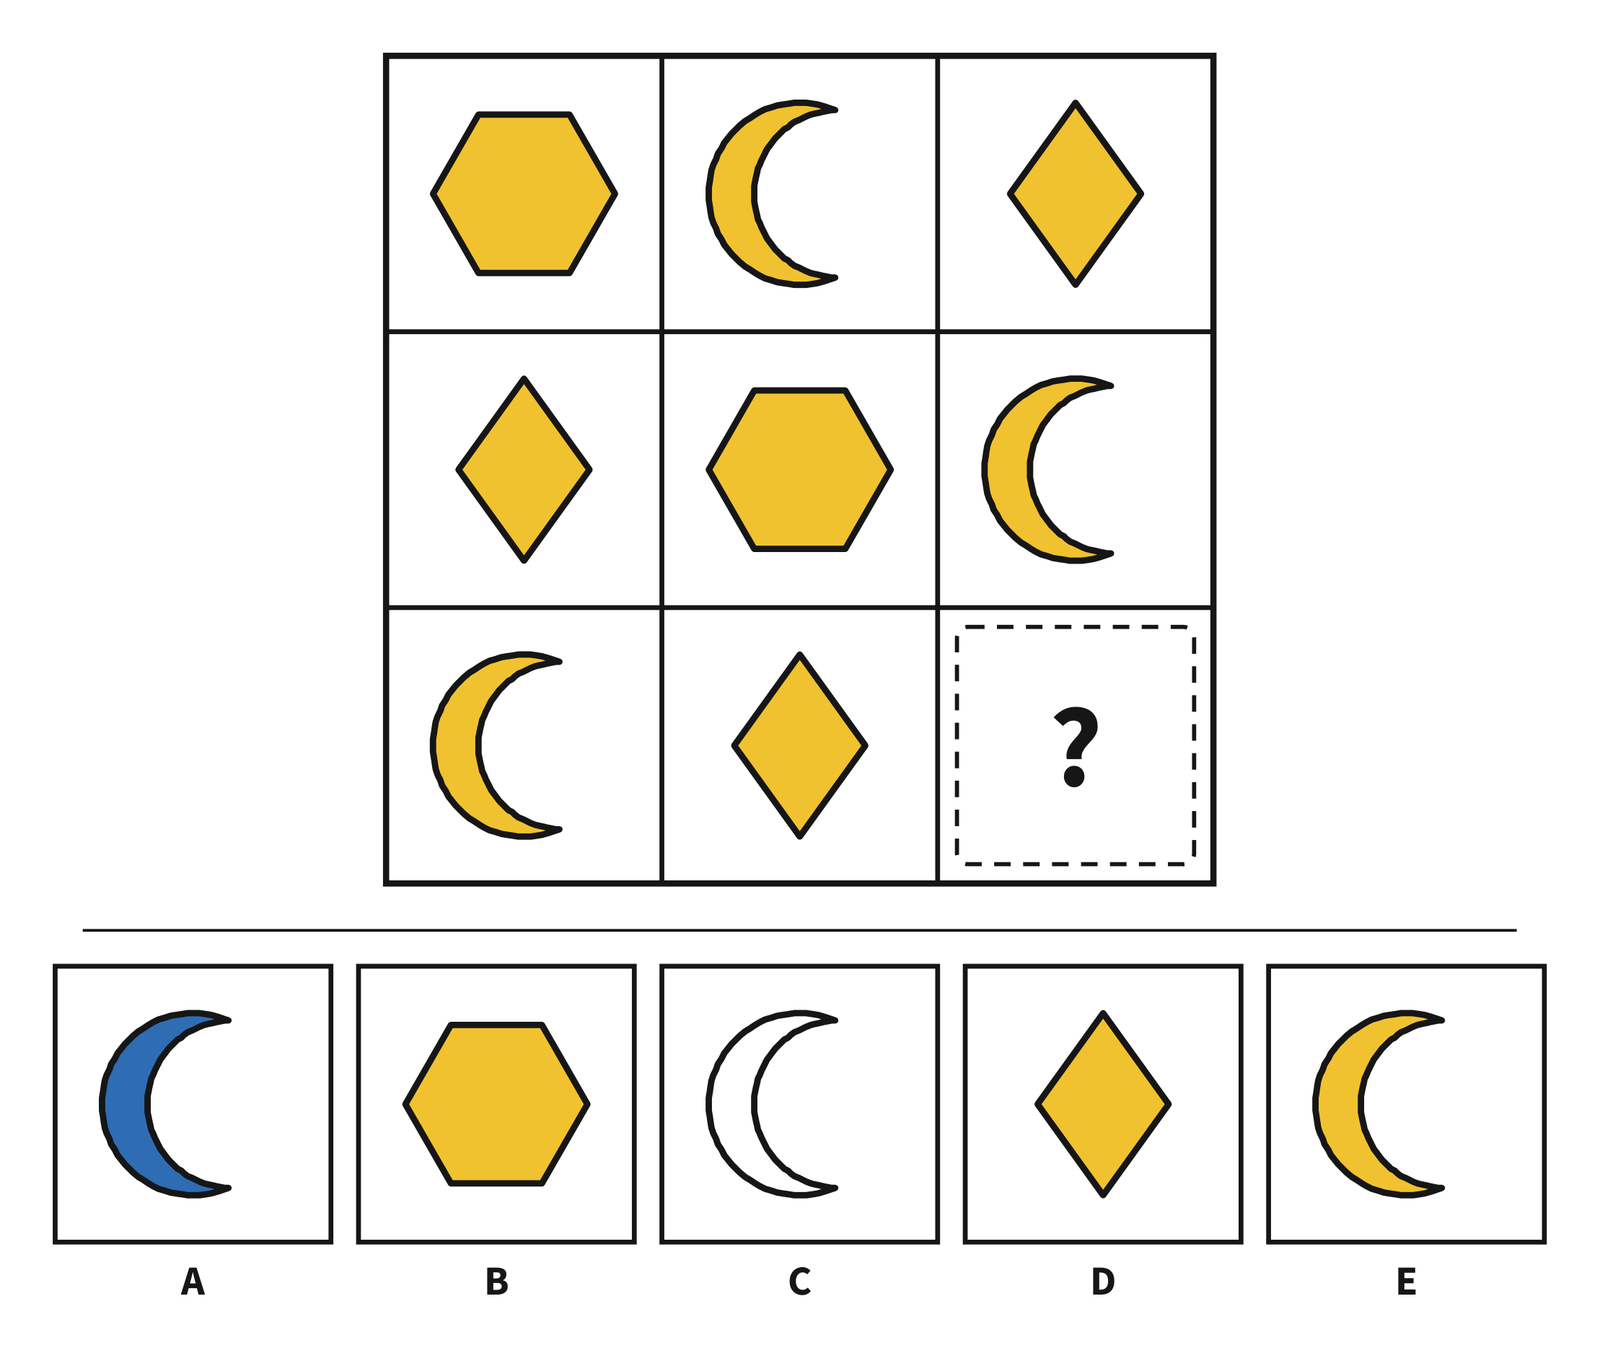
All figures are yellow. Top row: hexagon, crescent, diamond. Middle: diamond, hexagon, crescent. Bottom: crescent, diamond, question mark. Choices: A. Blue crescent. B. Yellow hexagon. C. White crescent. D. Yellow diamond. E. Yellow crescent.
From the workbook, p. 78 · Open full-size picture
Show answer and explanation for question 9

Answer B. Every row and every column has one hexagon, one diamond, and one moon. The bottom row is missing the hexagon. The missing picture is a yellow hexagon: choice B. Choice A repeats a shape from the bottom row and has the wrong color. Choice C has the wrong shape (a moon) and the wrong color (white). Choices D and E each repeat a shape that is already in the bottom row.

Question 10

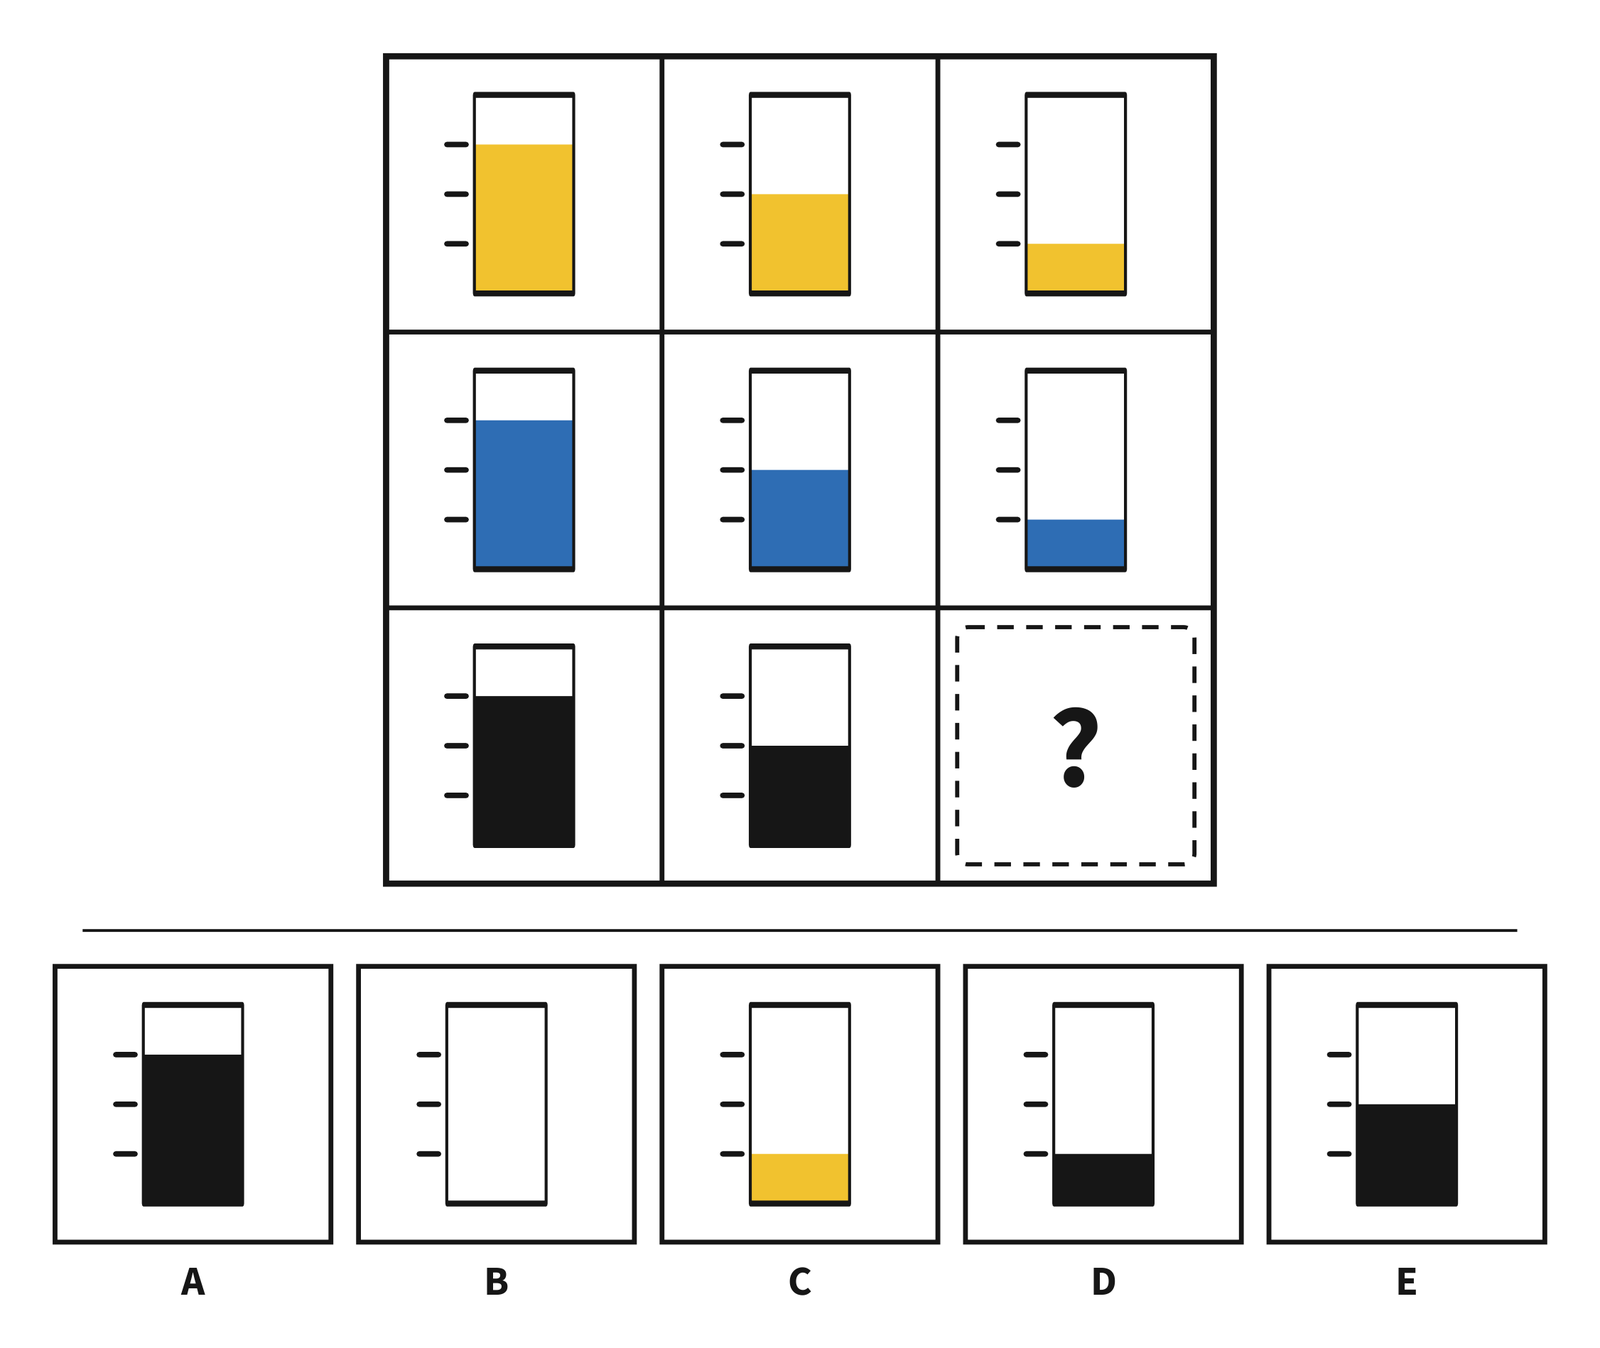
Each cell holds a vertical rectangle beside three tick marks. The top row has yellow fill up to the high, middle and low marks. The middle row has blue fill at those heights. The bottom row has black fill at the high and middle marks, then a question mark. Choices: A. Black up to high mark. B. Empty rectangle. C. Yellow up to low mark. D. Black up to low mark. E. Black up to middle mark.
From the workbook, p. 80 · Open full-size picture
Show answer and explanation for question 10

Answer D. Going across each row, the box empties one step each time. Each row keeps its own color. The bottom row goes three steps, then two steps, so the missing box is filled one step. The missing picture is a box filled one step with black: choice D. Choice A goes the wrong way and fills up instead. Choice B has emptied too far. Choice C is filled the right amount but has the wrong color. Choice E has not emptied far enough.

Question 11

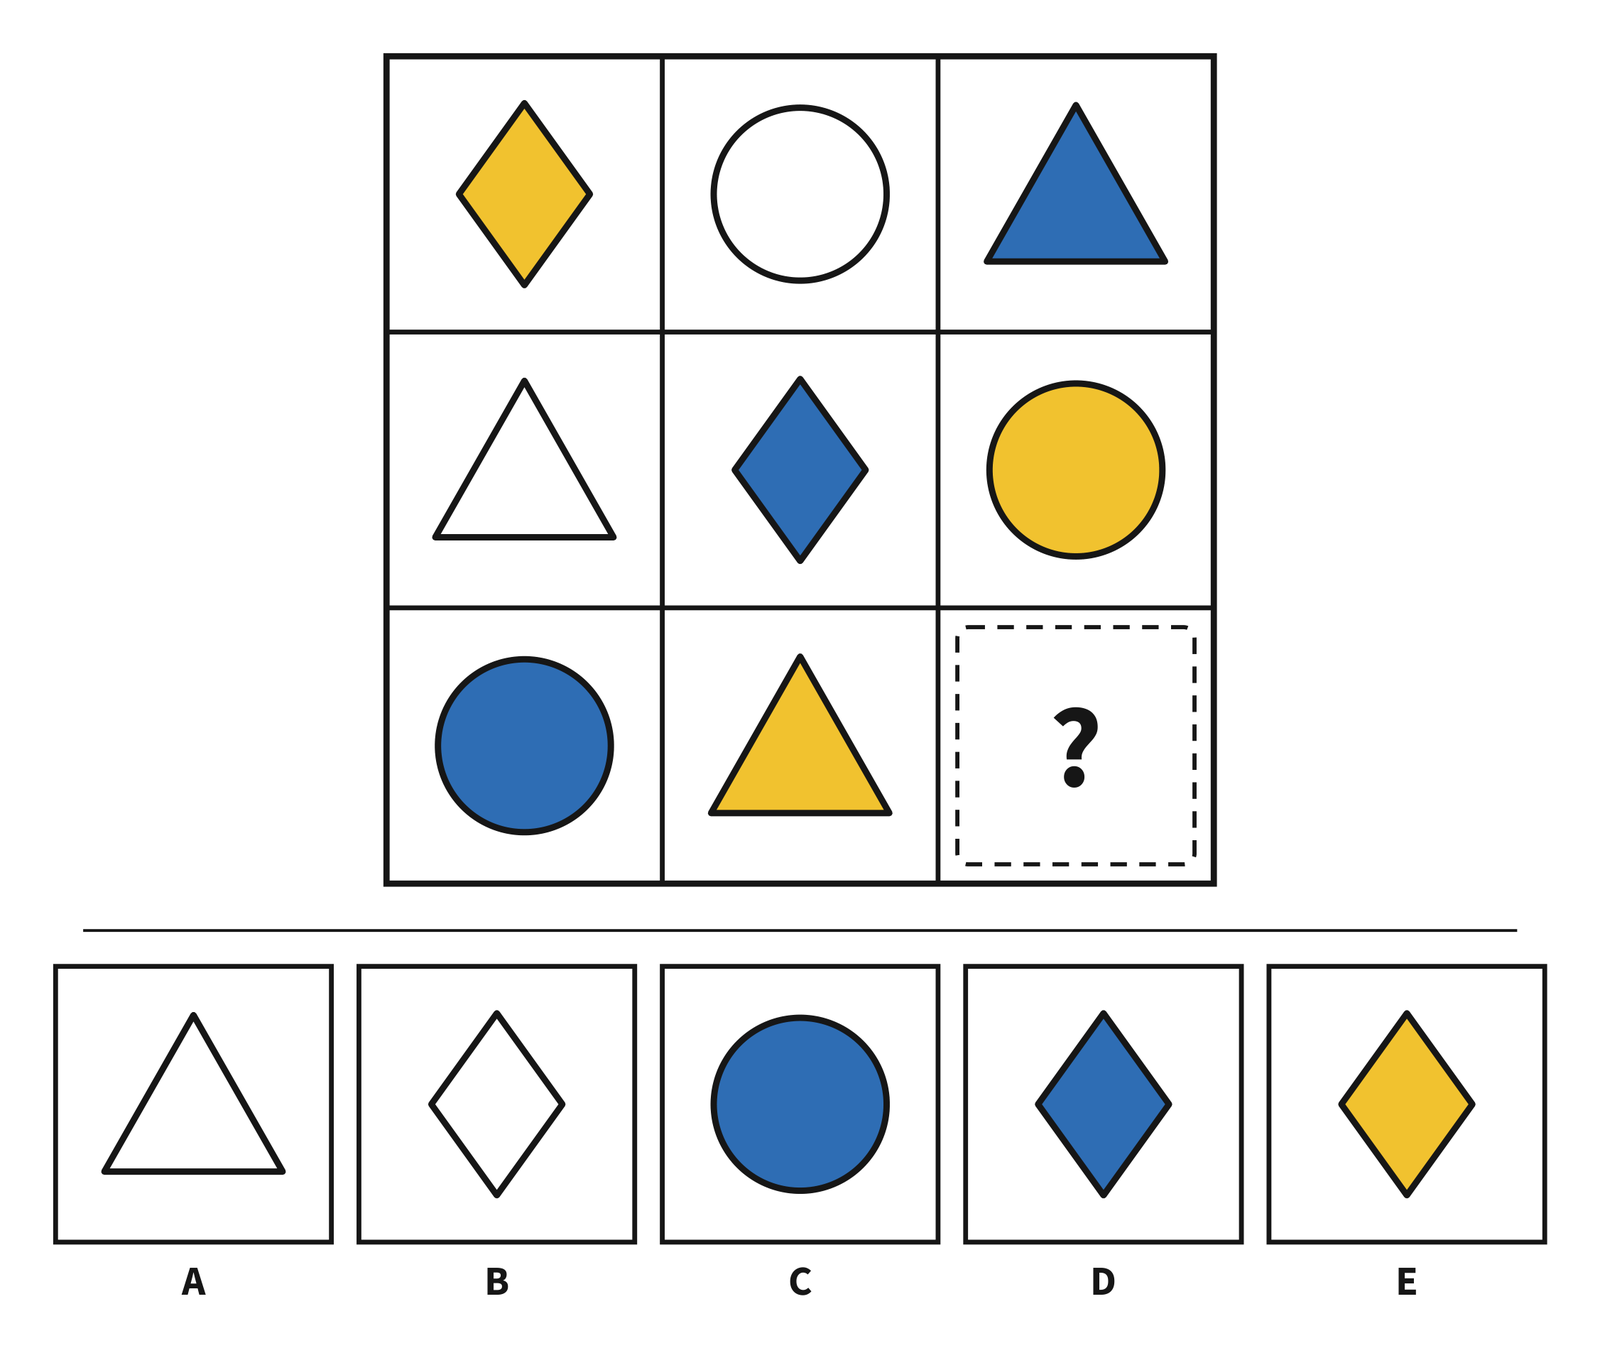
Top row: yellow diamond, white circle, blue triangle. Middle: white triangle, blue diamond, yellow circle. Bottom: blue circle, yellow triangle, question mark. Choices: A. White triangle. B. White diamond. C. Blue circle. D. Blue diamond. E. Yellow diamond.
From the workbook, p. 83 · Open full-size picture
Show answer and explanation for question 11

Answer B. Two rules work at the same time. Every row and every column has each of the three shapes once, and every row and every column has each of the three colors once. The bottom row still needs the diamond and still needs white. The missing picture is a white diamond: choice B. Choice A repeats a shape from the bottom row. Choice C uses the shape and color of the first box in the bottom row instead of the missing ones. Choice D has the right shape but the wrong color. Choice E repeats a color from the bottom row.

Question 12 · Stretch question

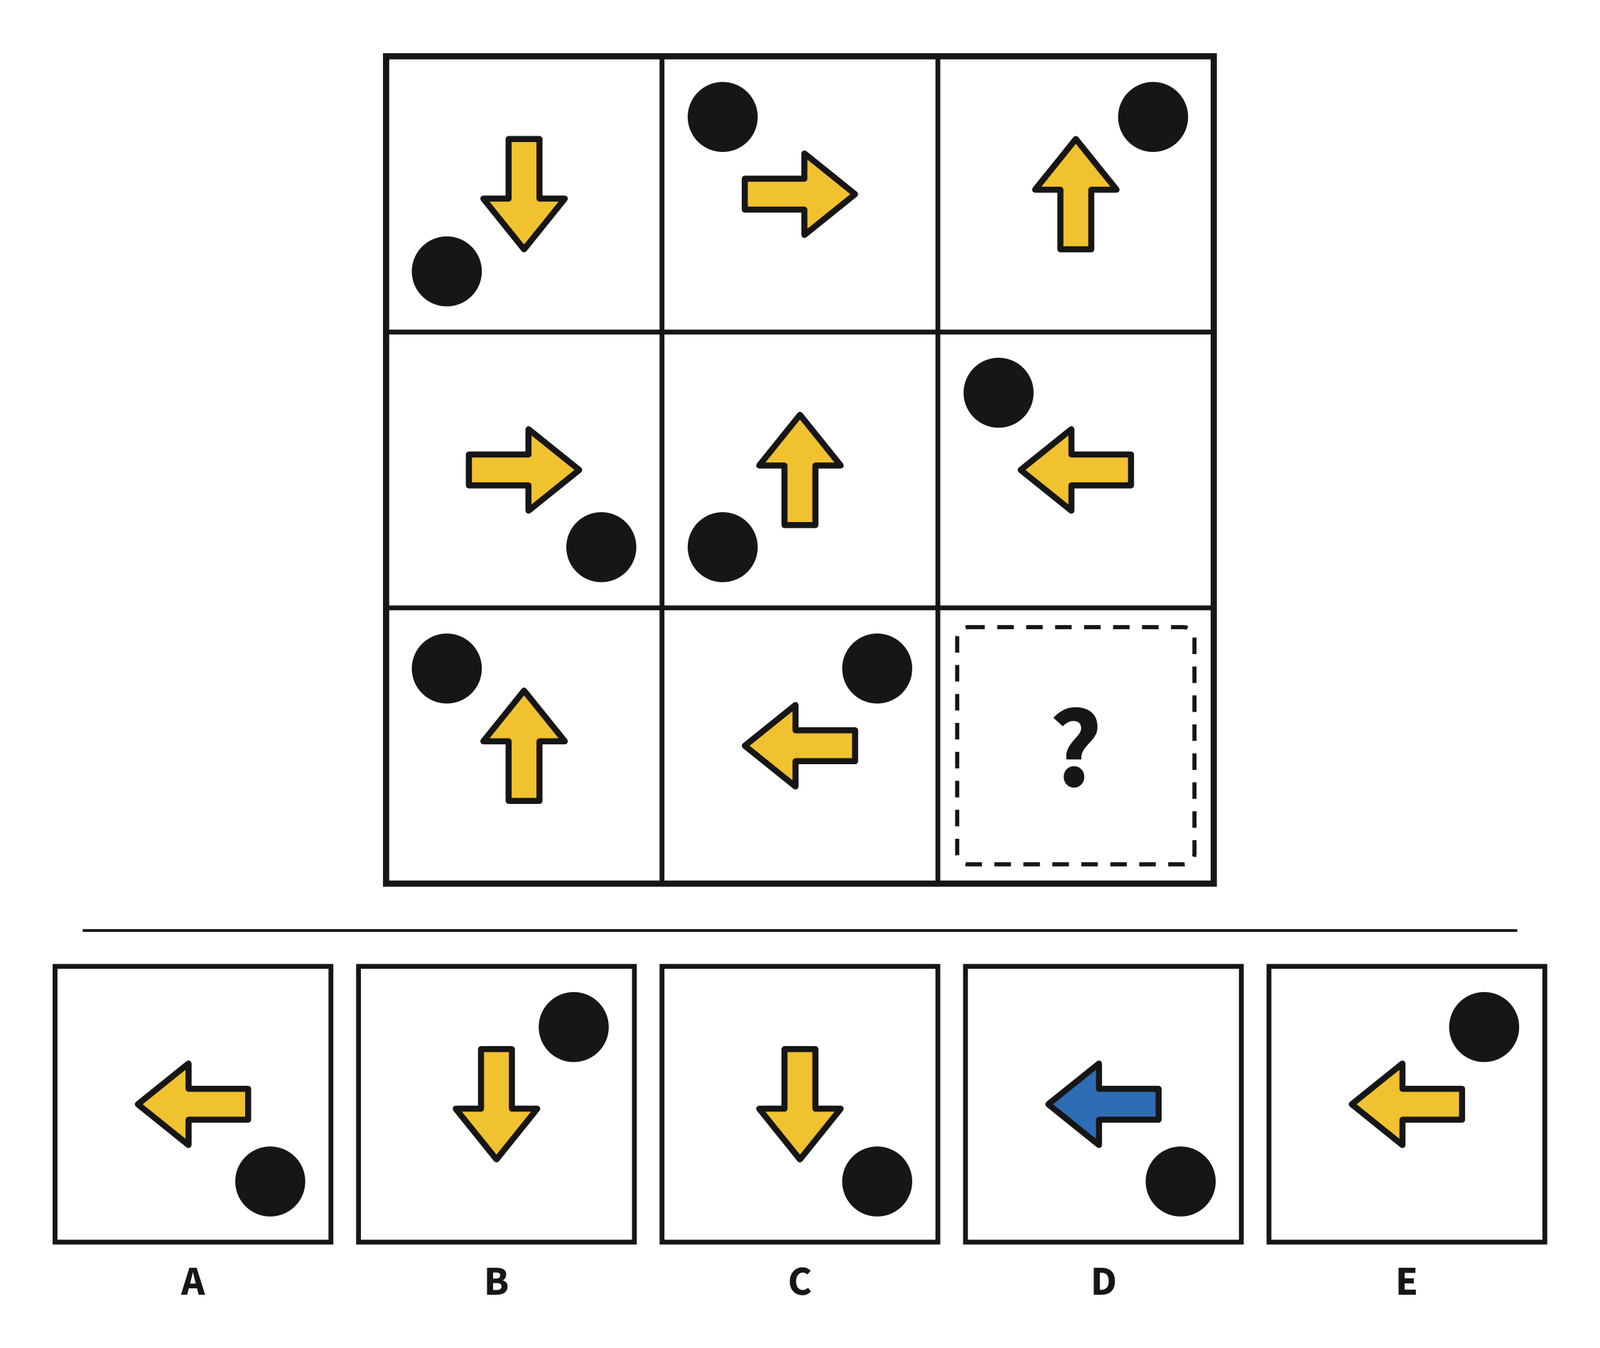
Each cell has a yellow arrow and black dot. Top, reading left to right: down with dot lower left, right with dot upper left, up with dot upper right. Middle: right with dot lower right, up with dot lower left, left with dot upper left. Bottom: up with dot upper left, left with dot upper right, question mark. Choices: A. Yellow left arrow, dot lower right. B. Yellow down arrow, dot upper right. C. Yellow down arrow, dot lower right. D. Blue left arrow, dot lower right. E. Yellow left arrow, dot upper right.
From the workbook, p. 84 · Open full-size picture
Show answer and explanation for question 12

Answer C. Two things change at every step across each row. The small circle moves to the next corner clockwise, and the arrow in the middle turns a quarter turn to the left. Each row starts in its own place. Move the small shape one more corner and turn the arrow one more quarter turn from the middle box of the bottom row. The missing picture is a box with the black circle in the bottom-right corner and a yellow arrow pointing down in the middle: choice C. Choice A moves the small shape but forgets to turn the arrow. Choice B turns the arrow but forgets to move the small shape. Choice D has the wrong direction and the wrong color (blue). Choice E copies the box before it.

Spatial visualization sample questions

The pictures are put together or flipped across a fold. Choose the picture for the empty space.

Question 13

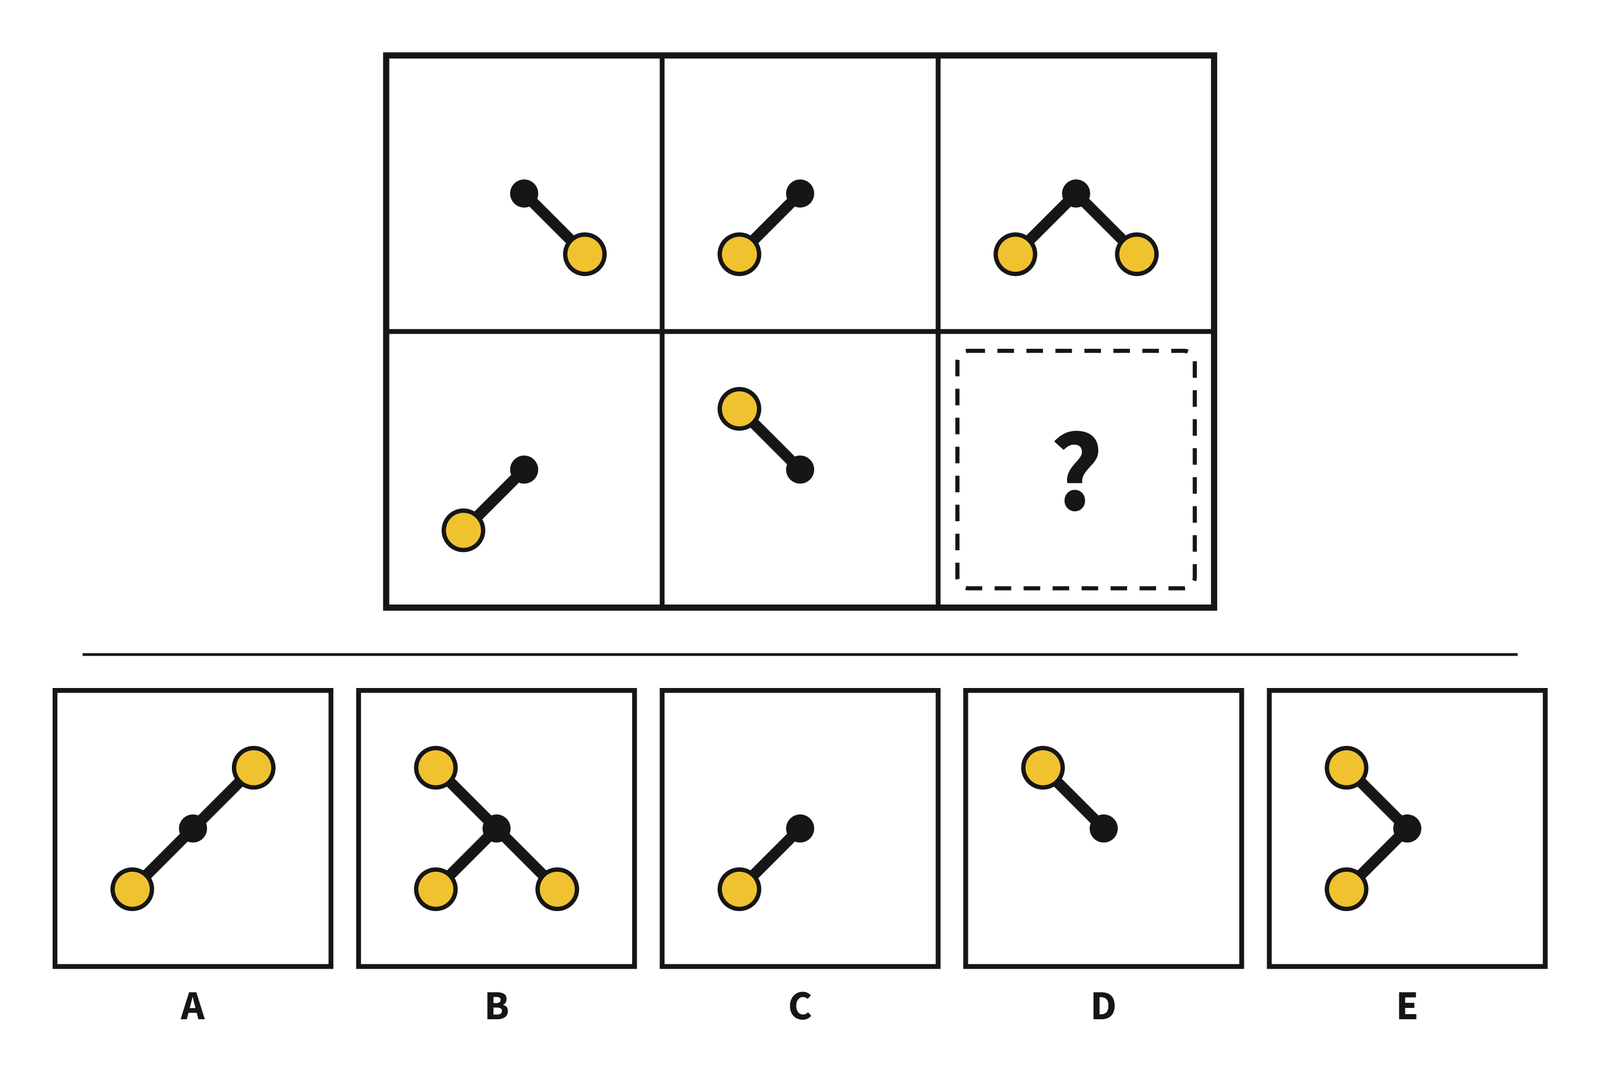
Black hubs have short spokes ending in yellow disks. Top row: a spoke down-right, a spoke down-left, then spokes down-left and down-right. Bottom row: a spoke down-left, a spoke up-left, question mark. Choices: A. Straight line from lower left to upper right. B. Three spokes to upper left, lower left and lower right. C. One spoke down-left. D. One spoke up-left. E. Two spokes to upper left and lower left.
From the workbook, p. 101 · Open full-size picture
Show answer and explanation for question 13

Answer E. In each row, the first two pictures are put together, one on top of the other, to make the third picture. Put the first two pictures of the bottom row together. The missing picture is the spokes pointing down-left and up-left: choice E. Choice A puts a part of the second picture in the wrong place. Choice B adds a part from another row that is not in these two pictures. Choice C shows only the first picture. Choice D shows only the second picture.

Question 14

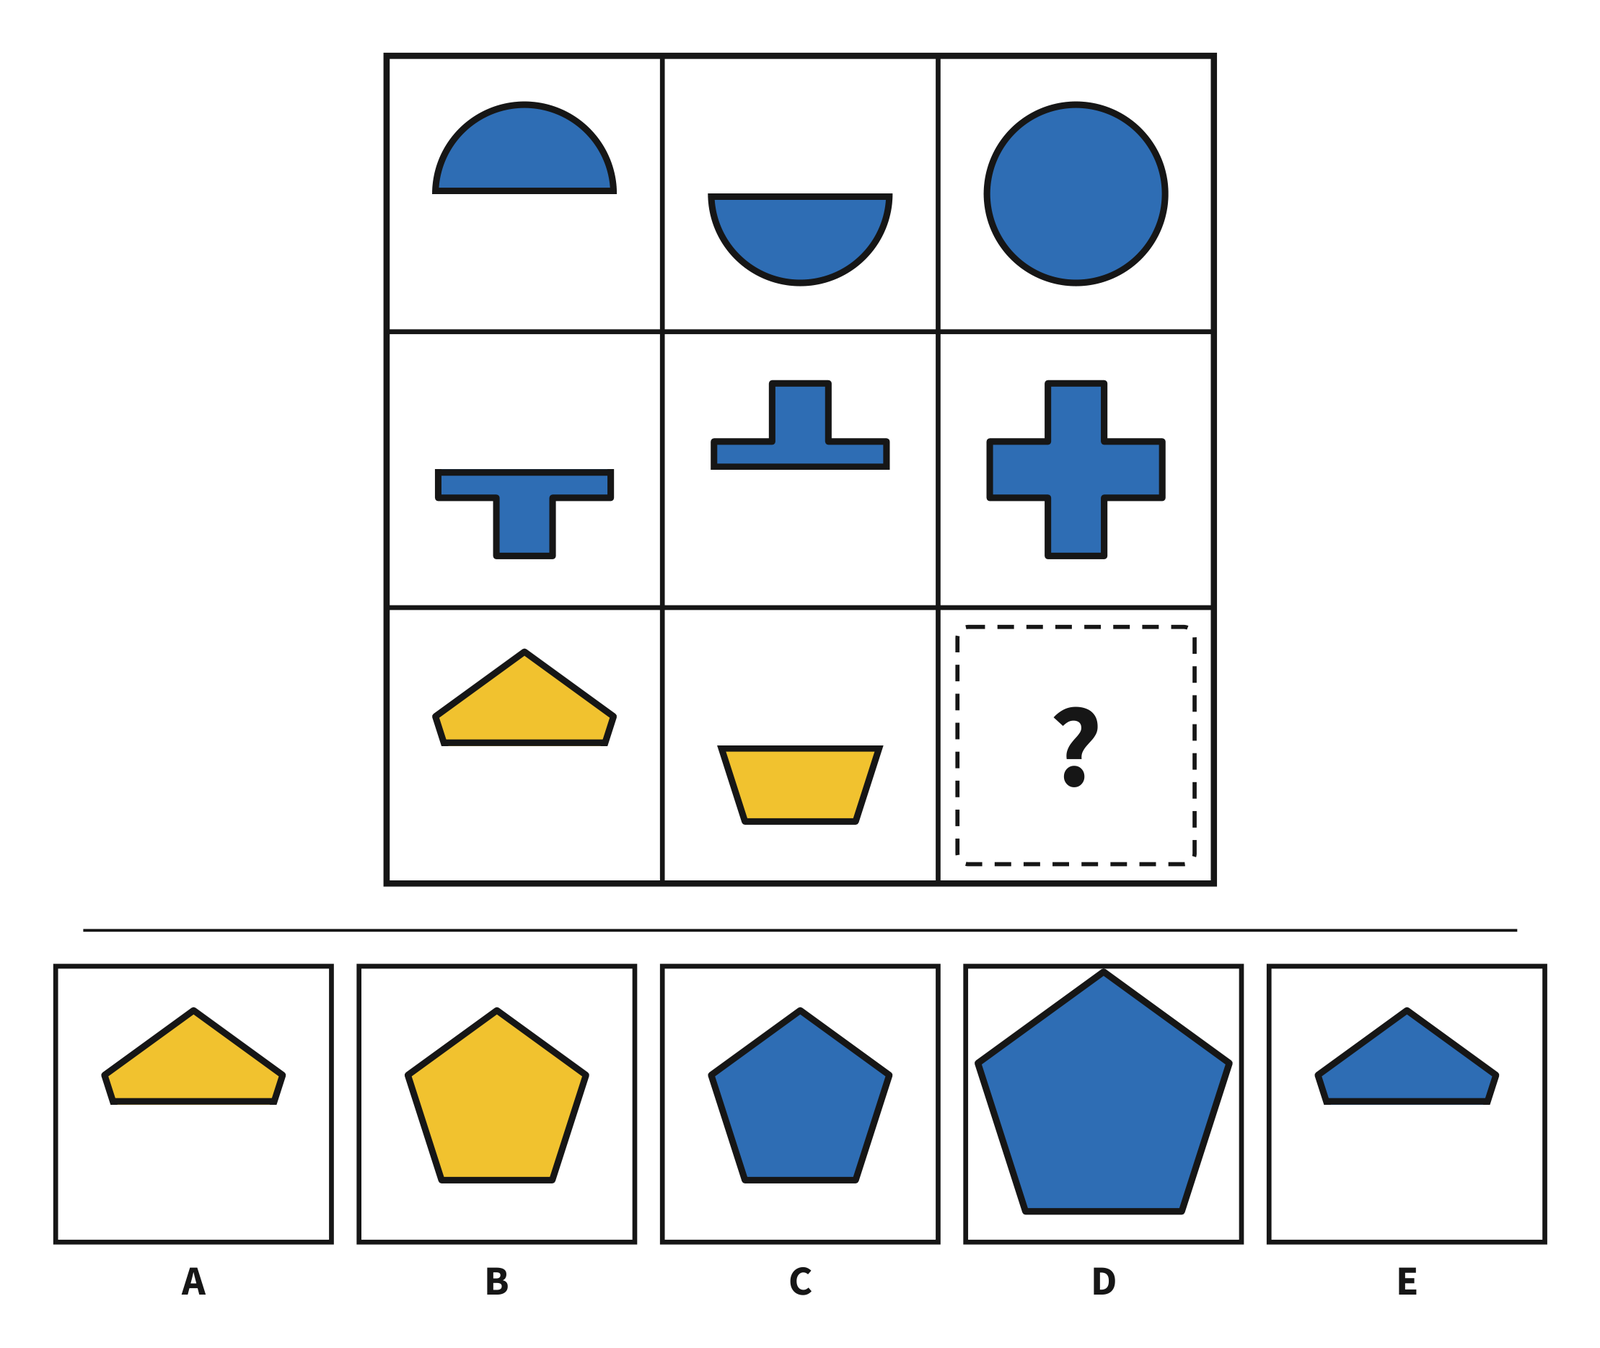
Three rows of three boxes. Top row: an upper blue semicircle, a lower blue semicircle, a blue circle. Middle row: a blue horizontal bar with a tab below, a blue horizontal bar with a tab above, a blue plus sign. Bottom row: a yellow roof-shaped piece with a flat base, a yellow trapezoid with its longer edge on top, a question mark. Choices: A. Shallow yellow roof-shaped piece. B. Full yellow pentagon with a point at the top. C. Full blue pentagon with a point at the top. D. Larger full blue pentagon with a point at the top. E. Shallow blue roof-shaped piece.
From the workbook, p. 103 · Open full-size picture
Show answer and explanation for question 14

Answer B. In each row, the first two pictures are two halves of one shape. They can come in either order, but each half is drawn on the side of its box where it belongs in the whole shape (a left half on the left, a top half at the top). Slide them together and they make the whole shape in the third box, with each half keeping its color. Join the two halves in the bottom row. The missing picture is a yellow pentagon: choice B. Choice A shows only one half. Choice C joins the halves but changes the color. Choice D has the wrong size (too big) and the wrong color (blue). Choice E has only one half of the shape and the wrong color (blue).

Question 15

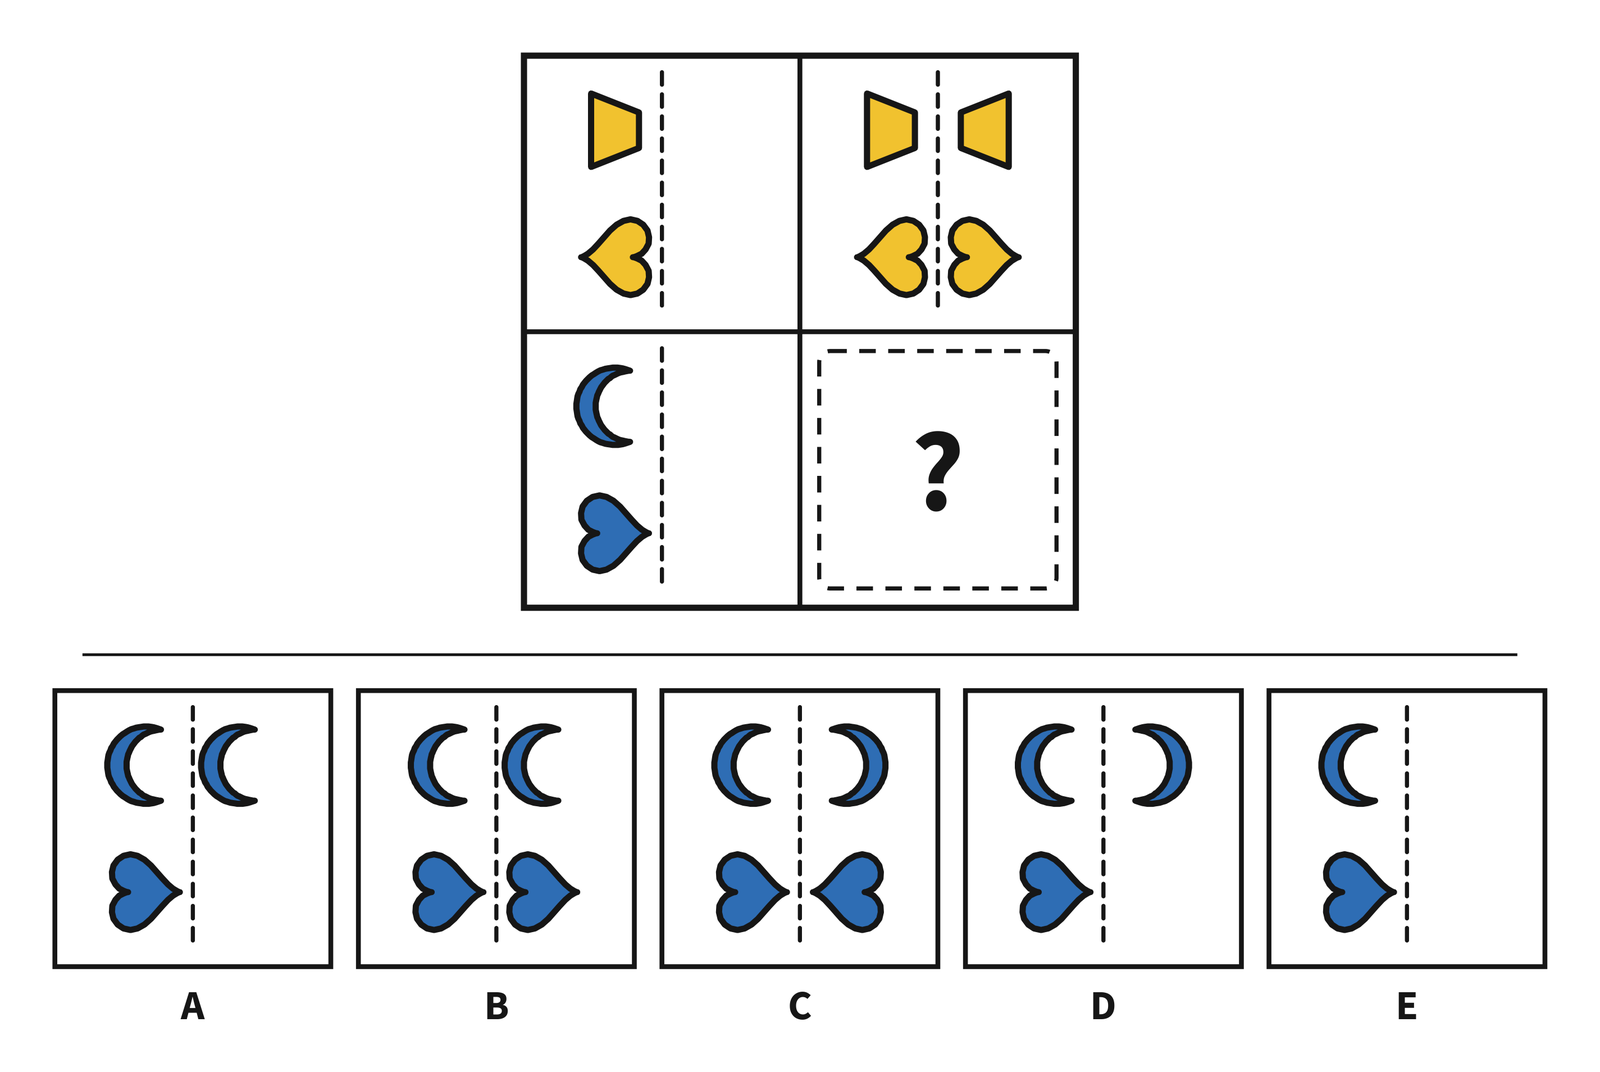
Each cell has a dashed vertical line. Top left has a small yellow wedge and sideways heart on its left. Top right shows these on both sides facing each other. Bottom left has a blue crescent opening right above a blue heart pointing right, both left of the line. Bottom right is a question mark. Choices: A. Two right-opening crescents and only the left heart. B. Two right-opening crescents and two right-pointing hearts. C. Crescents open toward each other and hearts point toward each other. D. Crescents open toward each other with only the left heart. E. Only a left crescent and left heart.
From the workbook, p. 105 · Open full-size picture
Show answer and explanation for question 15

Answer C. The dashed line is a fold. In the top row, fold the paper along the dashed line and press: every shape is printed on the other side as a mirror image, in the matching spot. Do the same with the bottom-left picture: each shape appears again on the other side of the line, flipped left to right. The missing picture is the shapes on both sides of the fold line, each one a mirror image of its partner: choice C. Choice A slides the shapes across without flipping them, and forgets one. Choice B slides the shapes across without flipping them like a mirror. Choice D forgets to copy one of the shapes. Choice E does not fold anything over.

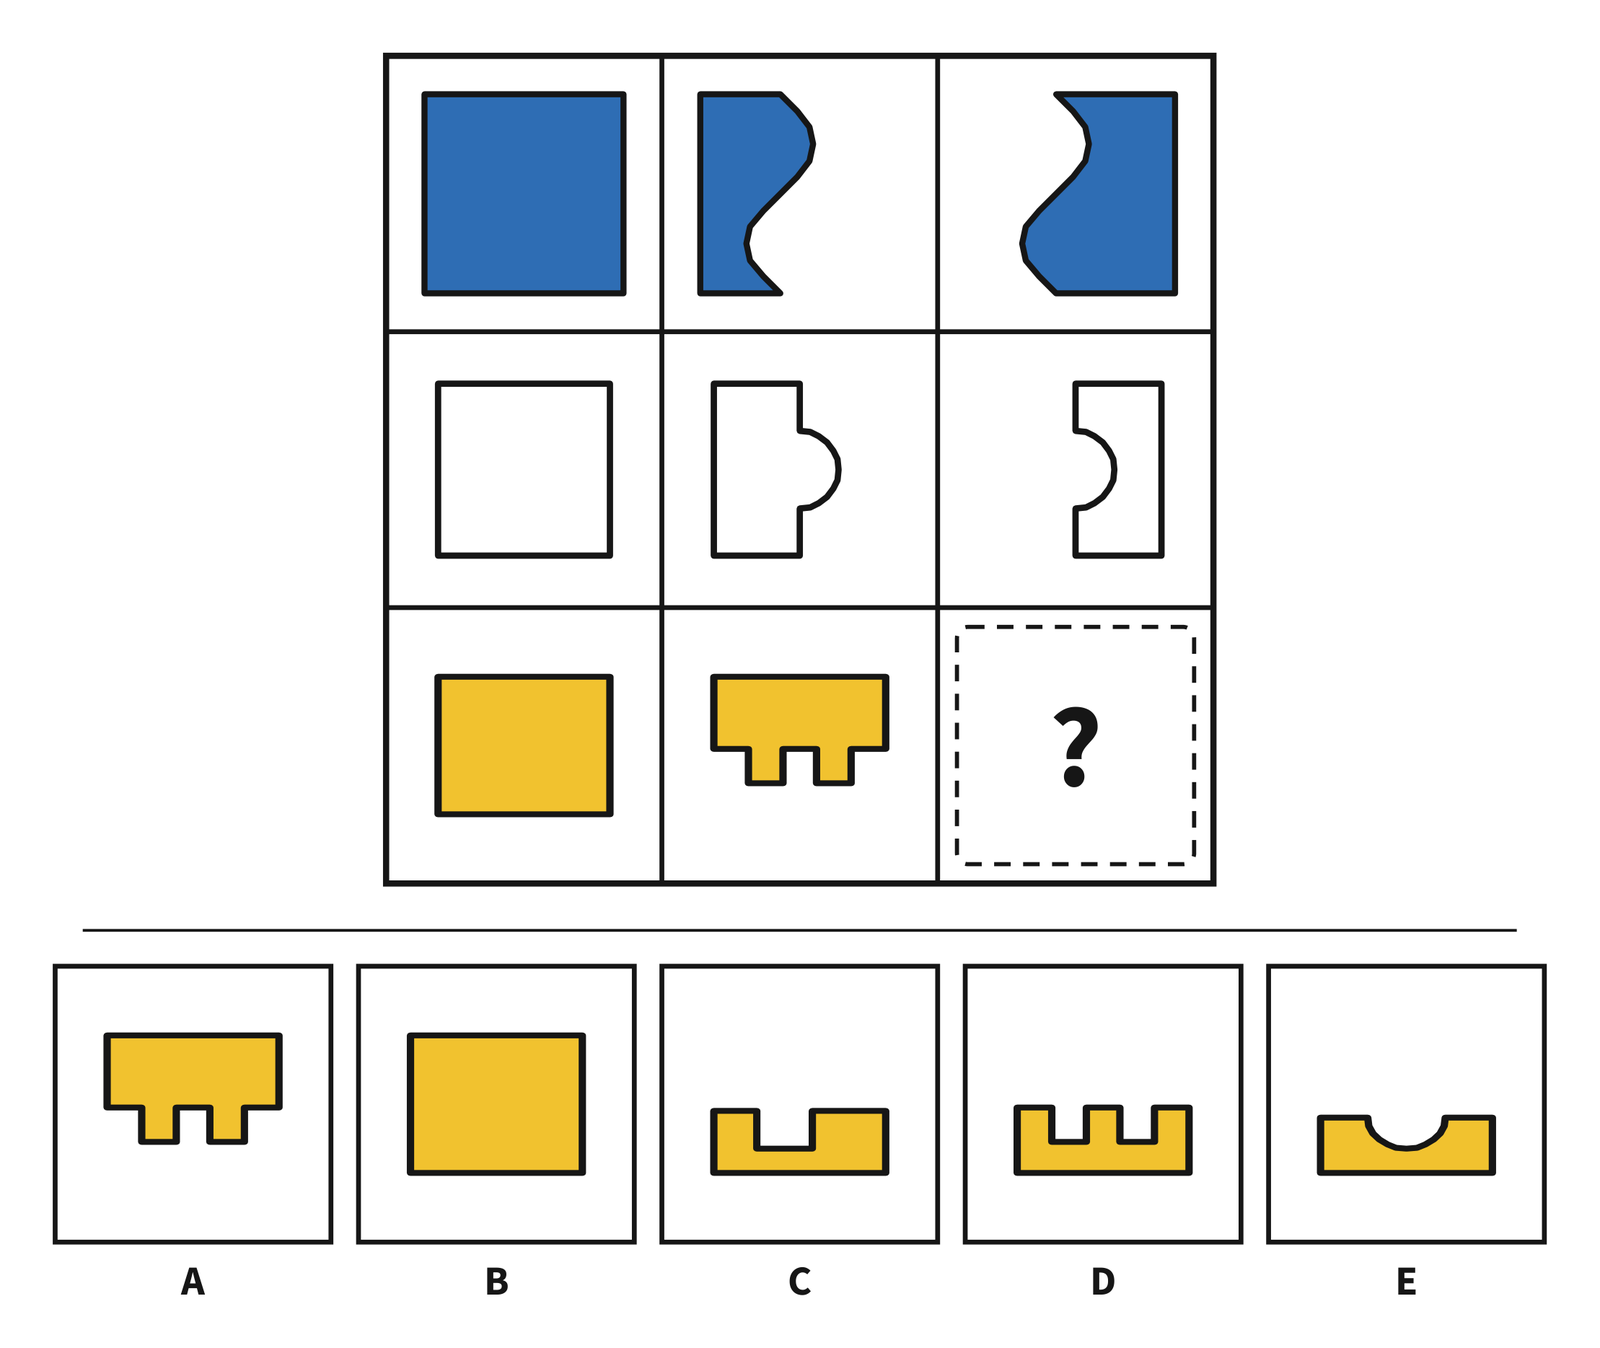
Question 16 · Stretch question

Top row: a blue rectangle followed by two blue pieces with wavy vertical edges. Middle: a white square followed by two white pieces, one with a round tab and one with a round notch. Bottom: a yellow rectangle, a yellow piece with two small rectangular tabs along its lower edge, then a question mark. Choices: A. Two tabs underneath. B. Solid rectangle. C. One rectangular notch on top. D. Two rectangular notches on top. E. One curved notch on top.
From the workbook, p. 106 · Open full-size picture
Show answer and explanation for question 16

Answer D. In each row, the first picture is a whole shape. It is cut into two pieces: the second picture is one piece and the third picture is the other piece. Each piece stays in the spot where it was in the whole shape. Picture the middle piece of the bottom row sitting inside the whole rectangle; the missing piece fills the part that is left. The missing picture is the piece that has an edge with two square dents to fit against the middle piece: choice D. Choice A copies the middle piece instead of finding the piece that fits with it. Choice B shows the whole rectangle instead of the missing piece. Choice C has an edge with a square dent, which almost fits but does not match the middle piece. Choice E has an edge with a round dent, which does not match the middle piece.

How to use this with a child

Give your child time to look at every choice. After they choose, ask what they noticed. Open the explanation together. Stop when your child needs a break.

Read about NNAT3 scores · Try the separate workbook sample

Free printables

More free practice tests

FAQ

Questions families ask

Are these real NNAT questions?

These are original Reasonwell Press workbook puzzles, not official Pearson questions. The short practice set does not predict a score.

Which level will my child take?

Pearson assigns Level D to Grades 3 and 4. Check the test name and level on your school notice.

Is the NNAT the same as the NGAT?

No. Pearson’s NNAT3 is one nonverbal test. MHS publishes the Naglieri General Ability Tests (NGAT), with separate Verbal, Nonverbal and Quantitative tests.

Should we print in color?

Yes. Color distinguishes some pieces and choices. If a color printer is unavailable, use the pictures on screen.

Should my child practice at all?

Follow your school’s guidance first. If practice is welcome, let your child try a few puzzles and talk about how they chose their answers.

Sources

Free PDF

Print the separate workbook sample

Six questions from the workbook’s practice sets, covering all four puzzle types, with explained answers.

Grades 3–4 · NNAT3 · 7 pages · 1.1 MB · Explained answers included

Download sample (PDF) ↓
Optional: get Reasonwell updates by email

Download NNAT3 Level D workbook sample ↓7 pages · 1.1 MB · No email requiredText version (screen-reader friendly): NNAT3 Level D workbook sample

Keep in touch

Get occasional practice resources and workbook news. The PDF is free to download above without signing up.

We never sell your email. Unsubscribe in one click.

Your request was received.

Thanks for joining the Reasonwell updates list. You can still download the free resources directly.

We could not save your signup. Please try again in a moment; the free downloads remain available.

NNAT® is a registered trademark of NCS Pearson, Inc., used here for identification purposes only. Reasonwell Press is independent and is not affiliated with, endorsed by, sponsored by, or licensed by NCS Pearson, Inc., which was not involved in producing our materials. Our practice materials are original NNAT®-style items, not actual test questions, and do not guarantee any score or placement outcome.